MU.LAB Free - AUDIO Recording
Recording setup
To attempt recording with a computer you need an audio processor or sound card
with either a LINE INPUT or a MIC INPUT port. Most computers have a 'mini' sound
card built into the computer that provides both of these inputs. They are actually
tied together and your studio software 'sees' these ports as a single AUDIO
INPUT. The MIC Input is very sensitive and should not be used except with a
low signal level mic. If you want to record the output of a radio, TV, Stereo,
MP3 player, External MIDI Synth, Guitar, etc. Use the LINE INPUT jack to record
these LINE level signals. DONT PLUG THESE INTO THE MIC INPUT because they will
overpower the MIC Input circuit.
Sound cards also have other Audio inputs that can be used such as S/PDIF, Digital,
AUX, Tape, MIDI Synth, CD, in addition to LINE level and MIC level inputs. Most
of these sound cards share one thing in common - Only one of these inputs can
be used to record an audio stream. There are some soundcards with multiple inputs,
but mostly this equipment is left to external mixers and pre-amps that are able
to handle multiple channels of audio recording. So the rule is - Select the
single source of Audio Input before attempting to record. Determine which
port in your soundcard mixer will give you a good recording signal level.
For this reason alone, professional recordings are 'multi-track' recorded outside
a computer. But for home studios this is really not a problem since there is
only one musician and one input to be recorded at a time. From an equipment
standpoint, a computer based home studio relies upon the operating system codecs
(drivers) to turn sound waves into audio files - principally .WAV files for
the PC and .AIFF files for the MAC. The Codecs do an excellent job and as long
as the computer has the necessary power (minimum requirements), there is faithful
reproduction of the recordings.
Today almost all home studio recordings are recorded at 44,100 hz with a bitrate
of 16 bits. What does this mean? It means that a second of recorded data will
be broken into 44,100 digital entries of 16 bits. So you can see that your computer
must have the capability to process 88,200 bytes per second for each audio stream
that runs concurrently. Since this all takes place digitally, there is no room
for error and faithful reproduction should be perfectly repeatable. This sample
rate (44,100hz) and the data bitrate (16) is often called CD Quality and governs
the size of binary audio data stored on a CD.
Of course, higher sample rates and bit rates are certainly available, but they
require faster computers, more memory and faster and larger disks.
Selecting the Audio Input
 Before
you begin to record, you must tell the sound card which Input you will be using,
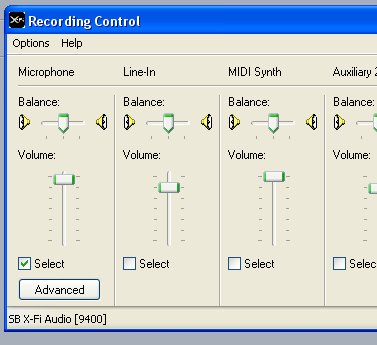
so that the signal will be recognized by the computer. This selection is usually
done with the Volume Control - In Windows this lurks in an Icon that resembles
a little speaker in the lower right corner of the Task Bar. Double-click the
Icon and select Properties>Recording. This reveals a list of the Inputs that
are available to your sound card. You can place a check mark by the input that
you want to record from. Remember, only one input can be used at a time for
recording.
Before
you begin to record, you must tell the sound card which Input you will be using,
so that the signal will be recognized by the computer. This selection is usually
done with the Volume Control - In Windows this lurks in an Icon that resembles
a little speaker in the lower right corner of the Task Bar. Double-click the
Icon and select Properties>Recording. This reveals a list of the Inputs that
are available to your sound card. You can place a check mark by the input that
you want to record from. Remember, only one input can be used at a time for
recording.
To record from the MIC, you must check the MIC channel for recording.
External mixing equipment can eliminate the single recording channel problem,
but adds expense and additional equipment. For our lessons that follow, please
check the MIC INPUT Channel as our recording source. And for this lesson you
must have a MIC that can be connected to the Red jack on your computer (MIC
INPUT). For Guitar, use the LINE IN channel. Whichever is selected will be routed
to the MU.LAB Audio Input that was selected when you setup MU.LAB.
The microphone that you use will set the quality of your recording. So, the
better the MIC, the better the recording. Since the computer itself operates
at CD Quality, the MIC (and your home studio) will determine the quality of
your recording. Most good mics will require a pre-amp, so the signal level is
easy to obtain.
Set the MIC Volume in the Recording Control mixer to about 75% (the
example shows about 95%, but this will vary). A figure of 75% is a good place
to start and we will need to vary this later to get a good solid signal.
Setting up the program to record
This exercise is not going to create a masterpiece. Since this tutorial is
designed to cover the basics of making music, you must learn the fundamentals
before getting into the steps that are needed to create more sophisticated music.
This step will teach you how to record an audio track with a background.
You are going to record the song 'My Darling Clementine'. You can, of course,
choose another song, but this example comes ready to use. We will load the song,
in midi format, so that that you will have something to sing or play along with.
We plan to use the mda-piano as a background, and then record our own audio
track alongside the background as it plays. Download the file - Clementine.mid
- a save it in your MU.LAB Free folder. (By now you should be able to download
files and save them easily).
 Start
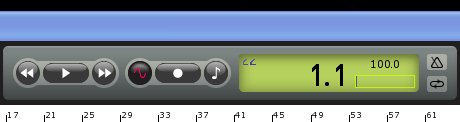
the MU.LAB Free program and select a new session. Set the BPM setting to 100,
in the tape transport bar and also click the Midi-Record OFF (little
picture of a note) and click the Audio Record ON (little picture of a
sine wave).
Start
the MU.LAB Free program and select a new session. Set the BPM setting to 100,
in the tape transport bar and also click the Midi-Record OFF (little
picture of a note) and click the Audio Record ON (little picture of a
sine wave).
 Also
we will want to tell the program to record a mono track as opposed to
a stereo track. This depends on your audio equipment, but usually the default
will be to record a stereo track if the equipment will handle it. This means
that a left and right audio track will be created. This is fine for the finished
piece of music, but for an individual track it is better to record the instrument
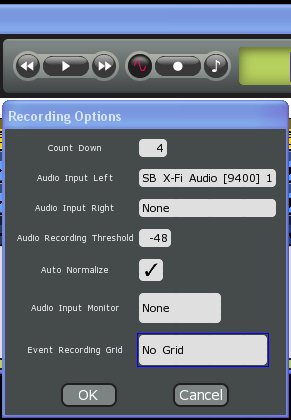
or vocal as a mono track so that it can be moved around in the final mix. Right-Click
on the record circle in the transport bar - a menu will popup. The menu
is your recording Options. On one of the Inputs, click and select None from
the list of inputs. Click on OK to save your options.
Also
we will want to tell the program to record a mono track as opposed to
a stereo track. This depends on your audio equipment, but usually the default
will be to record a stereo track if the equipment will handle it. This means
that a left and right audio track will be created. This is fine for the finished
piece of music, but for an individual track it is better to record the instrument
or vocal as a mono track so that it can be moved around in the final mix. Right-Click
on the record circle in the transport bar - a menu will popup. The menu
is your recording Options. On one of the Inputs, click and select None from
the list of inputs. Click on OK to save your options.
Now Click the FILE Button and then select Import MIDI File. An explorer
window will open and you can highlight the Clementine.mid file and then click
on OK. A midi track will appear. (For some reason, MU.LAB expands the size of
the track when loading a MIDI file). 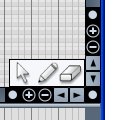 To
reduce the vertical size of the tracks in the composer window, Use the vertical
+/- buttons at the lower right of the composer window. Click on the '-' key
to reduce the size of the tracks back to what you are used to. This will make
room for us to see new audio tracks as they are added.
To
reduce the vertical size of the tracks in the composer window, Use the vertical
+/- buttons at the lower right of the composer window. Click on the '-' key
to reduce the size of the tracks back to what you are used to. This will make
room for us to see new audio tracks as they are added.
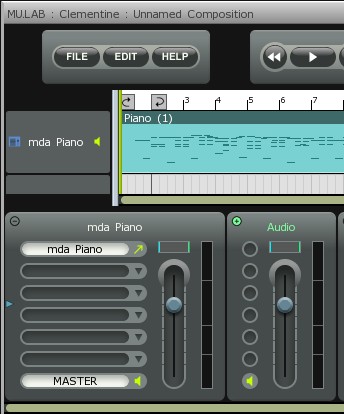 Now
let's hear what the Clementine sequence sounds like. Right click on the Clementine
track and set the midi sequence outout to Rack A then load the mda-piano
VSTi into the top slot of Rack A. By now, you should be able to set up a Rack
with a VSTi synth very easily.
Now
let's hear what the Clementine sequence sounds like. Right click on the Clementine
track and set the midi sequence outout to Rack A then load the mda-piano
VSTi into the top slot of Rack A. By now, you should be able to set up a Rack
with a VSTi synth very easily.
Click the rewind (double arrows to the left to make sure that we are at the
beginning of the track then click on start/stop arrow. You should easily
hear what the track sounds like. Sing or hum a few bars along with it to test
whether the key is right for you. (The Lyrics are printed below). Or if you
plan to record a guitar then play a few licks along with the song. If the key
is wrong, you will want to change to a more comfortable key. The original song
was recorded in E major.
To change the key, right-click on the Clementine Sequence and then Click
on Sequence then Click on Transpose notes. Type either a number of steps
up or down (- in front of the number of steps) and the entire midi file will
be transposed up or down the number of steps that were specified. Use the transport
to replay the midi file and see if the key is better for you. If not just go
back and change it up or down until it sounds right.
Note: 'My Darling Clementine' is a waltz (3/4 time), but all midi is
displayed as 4/4 in this program. However, this should not affect the audio
recording, since the total number of beats remains the same and the song will
be recorded at 100BPM.
Setting the Recording Level
One way to get the correct level of the recorded signal is to follow
this iterative procedure:
- Click the Record circle to record a few bars then click on the start/stop
arrow.
- give your recording a name and press Enter.
- Play it back.
- If it is not the right volume, double-click on the Windows mixer, Properties>recording
and raise or lower the MIC volume.
(Keep the Windows mixer active on your task bar until we are done)
- If you have a powered Mic, you can raise the volume or get closer to the Mic.
- Click on the recorded audio track to darken it, then press Delete. Poof, it's
gone
- rewind to the beginning.
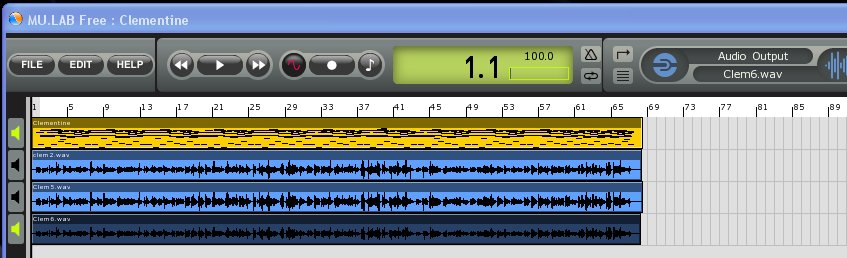
Repeat the steps above until you get the recorded volume correct. The outline
of the waves should be a clue as to the correct volume.
Another way
 MU.LAB
also provides an internal method to convert a Rack into an 'Input Monitor'.
This feature allows you to set the strength of your recorded signal by watching
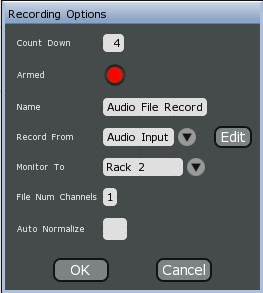
the Volume indicator and make adjustments while you are recording. Right click
on the little circle in the Transport bar (The record button). This will display
the Recording Options window.
MU.LAB
also provides an internal method to convert a Rack into an 'Input Monitor'.
This feature allows you to set the strength of your recorded signal by watching
the Volume indicator and make adjustments while you are recording. Right click
on the little circle in the Transport bar (The record button). This will display
the Recording Options window.
Click on the Audio Input Monitor box (which probably displays 'None') and select
an unused Rack. This Rack now becomes a path for the Audio Input signal to pass
before it is recorded - thus the indicator will display the strength of the
Input signal as it is being recorded. In the example, you will see that Rack
C has been selected as the Audio Input Monitor.
Begin your recording and watch the level of the signal. The strongest part
of your recording should not reach the top of the Audio level indicator. If
it does, it will leave a tiny red mark to show that part of your recording has
been clipped. For guitars this is not all bad (adds distortion) but for vocals
it is a spoiler.
Try to keep your recorded signal away from the top of the audio level meter.
Recording a Track
To record an audio track, make sure the transport is at the beginning of the
song, where you plan to begin recording. Click on the Record Circle to begin
recording. The metronome will count off 4 beats and you can begin recording.
Just remember that - Oh, My Darling - begins on beat 3 of the first measure.
But you knew that.
When the volume is to your liking, go ahead and begin recording. If your take
is not acceptable, just don't give the file a name and it will not be saved.
If part of it is great, then save it with another name. (We will get to audio
editing at a later time and show you how to take the good parts from one take
and paste them where the bad parts were.) When you begin recording another take,
make sure that previous recordings are muted (little speaker to the left of
the track is dark). MU.LAB Free will always add another track when making a new
recording.
Note: If you are using the Audio Input Monitor Rack, your recorded track
Output will default to this same Rack you have set. After a successful take,
you may want to change the routing of the Audio track Output to another Rack.
Note: If no setting has been made as to the output Target, the output
of the Audio tracks have defaulted to 'Audio Output' so they are going straight
to your Audio bus on the soundcard without the ability to set the volume or
add effects. Audio Output is listed under Others in the Part output section
(upper right of the Compose window). If you click on this Output, you can select
another Rack to send the Audio output and then have control over the volume
and be able to add effects to your audio recording.
The mixer strips in the Rack Window are there to help you balance the parts.
If the piano part is too loud, cut it back with the mda-piano mixer strip. Likewise,
the playback of your recording can be adjusted for a good balance. The recording
can be viewed much closer, by double-clicking and opening up the audio editor.
At the left of the audio editor is a vertical scale calibrated in dB. An ideal
signal will never exceed a point about -3dB from the top or bottom. If the signal
reaches 0 dB at the top or bottom, that means that 'clipping' will occur - your
signal will be lost and the sound of this is usually unpleasant, so you don't
want to have any of these occurrences in your recordings. So adjust your recording
level to eliminate clipping. If you notice clipping in your take, you will have
to re-record that portion so that a good version is available.
When you think you've got it, Save this session with your recorded track(s)
so we can use the session in a later tutorial. You may want to make the session
name something like Clementine, so we will recognize it later. You have reached
the end of this section of the tutorial. It's time to review the summary. So
skip over the lyrics below.
Lyrics
My Darling Clementine
In a cavern, in a canyon,
Excavating for a mine,
Dwelt a miner, Forty-niner,
And his daughter, Clementine.
Oh my darling, Oh my darling,
Oh, my darling Clementine,
You are lost and gone forever,
Dreadful sorry, Clementine.
Light she was, and like a feather,
And her shoes were number nine,
Herring boxes without topses,
Sandals were for Clementine.
Oh, my darling, Oh my darling,
Oh, my darling, Clementine,
You are lost and gone forever,
Dreadful sorry Clementine,
Drove the ducklings to the water,
Ev'ry morning just at nine,
Hit her foot against a splinter,
Fell into the foaming brine.
Oh, my darling, Oh, my darling,
Oh, my darling, Clementine,
You are lost and gone forever,
Dreadful sorry Clementine.
Ruby lips above the water,
Blowing bubbles soft and fine,
Sad for me, I was no swimmer,
So I lost my Clementine.
Oh, my darling, Oh, my darling,
Oh, my darling, Clementine.
You are lost and gone forever,
Dreadful sorry Clementine.
In a cavern, in a canyon,
Excavating for a mine,
Dwelt a miner, Forty-niner,
And his daughter, Clementine.
Oh my darling, Oh my darling,
Oh, my darling Clementine,
You are lost and gone forever,
Dreadful sorry, Clementine.
Lost and gone forever,
Awful sorry, Clementine.
Lost and gone forever,
Oh, my darling, Clementine.
Summary
- Use your Windows mixer / Recording Properties to select the recording source
e.g. MIC input for vocals, LINE IN for guitar, etc.
- Use your Windows mixer / Recording Properties to set the recording level.
(or adjust MIC power levels). The level should never reach 0db in a recording
- this is known as clipping. Setting the Recording Level is a critical step
in making successful live recordings.
- Record a Mono Track as opposed to a Stereo Track.
- Use a good Microphone for the best quality sound.
- Try to record in a key that works for you.
- To record, make sure the little wave is lit (Audio recording) and the metronome
is OFF. Click on the Record Circle to begin. Start/Stop arrow when done.