It is sometimes advantageous to change parameters of the synthesized sound over time - and do it automatically at the exact moment that is required or at a predetermined rate. This can also be done manually by just turning the knobs of the VSTi or Rack strip while the part is playing, but doing this manually can be inaccurate and never as precise as setting the parameter levels into the track ahead of time at precise positions in the piece and being able to set the levels exactly as needed. In MU.LAB terms this means changing the parameters of the Part Player - which may be a VST synth or effect or a Rack strip. In a few words, you are programming a specific control parameter by drawing in the parameter level over time.
Some VST plugins, do not support automation because they were not designed to make their parameters available to the host program. And some host programs have not implemented the ability to control VST parameters even if they are made available. So the choice of either the host program or the VST Plugin will govern whether you can influence the sound through the use of automation. We are fortunate that MU.LAB has the capability of controlling VST and mixer strip parameters by entering control events. These events are very similar to control events that are included with MIDI sequences and are also entered in the controller matrix which is found just beneath the note editor in the Midi editor window. The parameter to be controlled (automated) is named in the lower left corner of the Midi Editor window which usually defaults to - Note Events - typically velocity. By clicking on the name of the event, a list of parameter that can be controlled will be displayed. The parameter to be controlled (automated) can then be selected.
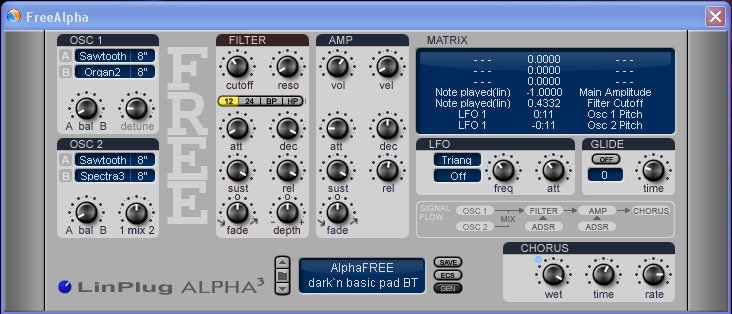
For this tutorial, we will be using another VSTi known as Free Alpha 3. This is an extremely versatile synth that has been made available by Linplug for both the PC and the MAC. It is capable of creating a variety of electronic sounds that can be used in anyone's music.
Note: Free Alpha 3 replaces an earlier version of Free Alpha which may be used as well with the exception that many of the old patches will not work with the new version. We advise you to use the latest version of Free Alpha in order to complete the tutorial as easily as possible.
To get your very own copy of Free Alpha 3, click on this link to the Linplug Download page - All of Linplugs products are listed on this page, but for this exercise you should download only the Free Alpha 3. Both PC version (.exe) and OSX version (.dmg) can be downloaded from this page as well as the Alpha manual (PDF).
If you have been following our tutorial, you will have downloaded the FreeAlpha installer to the Download directory. Now click on the installer and install Free Alpha into your VST directory.
For this exercise, you will be importing a preexisting midi file into MU.LAB; creating a new sequence track for the automation; and then automating the new sequence track with automation that controls the output of Free Alpha. At the same time we will be demonstrating the ability to route the output of one Rack strip to another.
 For
this demonstration you can use any midi file, preferably a single instrument,
but we have provided a midi file that will just fill the bill and allow a quick
demo of the automation process. So download the midi file - example-automate.mid
onto your machine. Please remember where you downloaded the file to. If it was
downloaded to the Download Directory, then this is where you will be
able to find it when it is imported into MU.LAB.
For
this demonstration you can use any midi file, preferably a single instrument,
but we have provided a midi file that will just fill the bill and allow a quick
demo of the automation process. So download the midi file - example-automate.mid
onto your machine. Please remember where you downloaded the file to. If it was
downloaded to the Download Directory, then this is where you will be
able to find it when it is imported into MU.LAB.
Open up MU.LAB as a new session, and import the example-automate.mid file into MU.LAB. It will probably appear as Track 2.
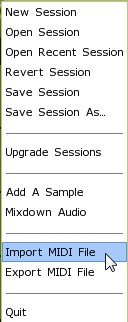
To import this file, click on the FILE Button in the upper right corner of MU.LAB. The drop down menu will look like this. Click on Import MIDI File and then look for the example-automate.mid file in the directory tree. Locate the file, highlight it and click on OK.
Now as a next step, click on the File button again and this time choose the VST Plugin Manager This will display the existing Plugins available to MU.LAB. If Free Alpha is not in the list (assumed), then click on the Add VST Plugins button and follow the directory tree to Free Alpha folder or to the FreeAlpha plugin itself, highlight it and then click on OK. This should add Free Alpha VSTi to your VST plugins.
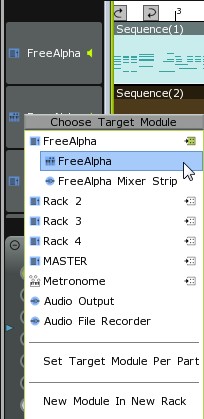 Now
Click on the midi sequence track to select it and assign the output to Rack
A (upper right Part Select). Now Click in the top slot of the Rack A strip and
then under Synth, select the VST FreeAlpha. The FreeAlpha VST will be installed
in the Rack. Click on the 'e' EDIT Button to display the FreeAlpha controls.
On the Free Alpha Synth, the bottom center display shows the current preset
and provides arrows to scroll through the list of presets. Clicking on the name
will provide a window showing all the presets available in the current bank.
Select the dark'n basic pad BT Preset (see the Free Alpha picture above
to help identify this area).
Now
Click on the midi sequence track to select it and assign the output to Rack
A (upper right Part Select). Now Click in the top slot of the Rack A strip and
then under Synth, select the VST FreeAlpha. The FreeAlpha VST will be installed
in the Rack. Click on the 'e' EDIT Button to display the FreeAlpha controls.
On the Free Alpha Synth, the bottom center display shows the current preset
and provides arrows to scroll through the list of presets. Clicking on the name
will provide a window showing all the presets available in the current bank.
Select the dark'n basic pad BT Preset (see the Free Alpha picture above
to help identify this area).
Note: The set of presets for PC and for MAC are entirely different! And they may have changed over time. So if you can't locate the dark'n basic pad BT Preset, it is not important for this tutorial. Just select a preset that you are comfortable with.
Now we are going to change things around a little bit and route the output of Free Alpha from Rack A to Rack B.. The bottom slot will probably read - Audio Output. This is the default routing for a new Rack. However, to illustrate how easy it is to send the output to another Rack strip, you should now click on the name in the bottom slot, click the drop down and select Rack B. .The Rack A strip should now look like this. The output of Free Alpha will now be sent to Rack B, before it goes to the Audio Output.
Before adding the automation, let's hear what the Free Alpha sounds like. Click on the Start/Stop arrow in the transport bar and listen to the playback. If you can't hear it, go back and check your work. During playback, operate the Gain control in Rack B. You will note that this now controls the overall volume of the audio signal from the Free Alpha VST coming from Rack A. Both meters will show that a signal is being processed.
Note: Synthesizers such as Free Alpha with lots of sustain or decay may sometimes stick on a note when the sequence is stopped suddenly at an inappropriate moment. MU.LAB provides a means of killing the audio engine should this condition occur. Select Help and click on Reset Realtime Engines to clear the Audio stream.
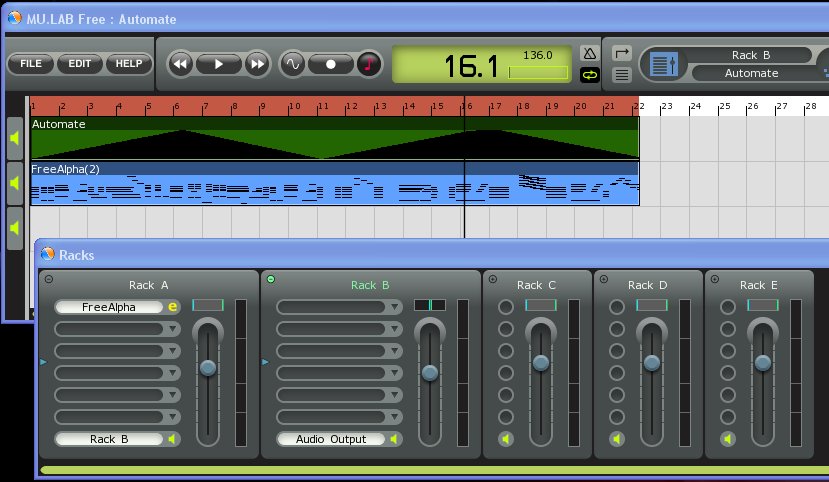
Next, you will need to create the automation sequence. Since Track 1 is not used, use the pencil tool and drag from bar 1 thru bar 24. Then, when prompted, select sequence as the track type. Now click on the new track to select it and then assign the Output to Rack B. This directs the sequence of automation to Rack B.
For ease in listen to our results we have looped the measures 1 - 23. (drag from bar 1 to bar 23 then right click on the bars and select Toggle Loop)
 .
.
So now let's add some automation. 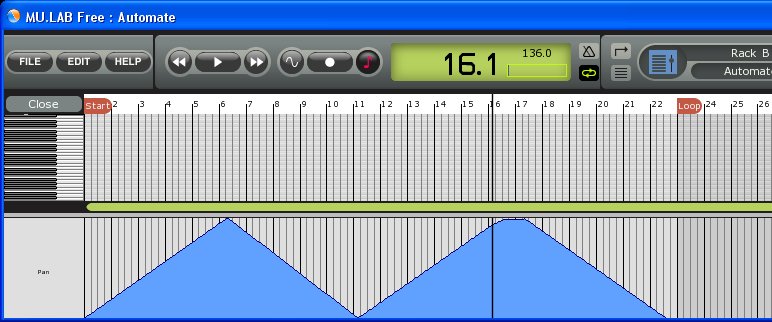
For clarity we have renamed this sequence to Automate. You can rename a sequence by right clicking on the track and selecting Rename. Double-click on this new sequence track. This will bring up the Sequence Editor. The lower matrix of the Sequence Editor is for control automation for both midi control data and VST parameter controls.
Lets expand the view to cover all the measures in our sequence so use the '-' key in the horizontal (time axis) to expand the number of measures in view beyond measure 23 where our sequence ends. Also drag the Loop Stop indicator out beyond measure 23.
 For
purposes of illustrating how to apply automation, we will demonstrate how to
smoothly make the resulting sound move from far left to far right, twice, during
the playing of this sequence. The control is going to be applied to the Main
Rack controls in Rack B. Each Rack strip has a Gain, Stereo Pan, Stereo Width
Control. Here we will be sending a Midi sequence to the Stereo Pan control by
creating a stream of PAN events that are sent to Rack B.
For
purposes of illustrating how to apply automation, we will demonstrate how to
smoothly make the resulting sound move from far left to far right, twice, during
the playing of this sequence. The control is going to be applied to the Main
Rack controls in Rack B. Each Rack strip has a Gain, Stereo Pan, Stereo Width
Control. Here we will be sending a Midi sequence to the Stereo Pan control by
creating a stream of PAN events that are sent to Rack B.
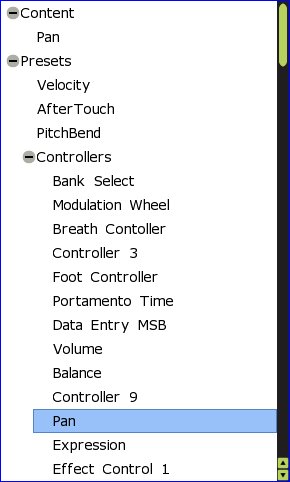
Click on the lower left box which contains the name of the control. Typically the default here is Note Events (velocity). Drill down in the Controllers and select Pan. Our goal is to automate the position of the sound so that it flows from left to right smoothly as the sequence streams.
You can now use the pencil tool to draw in an 'envelope' that will be translated into changes in the position of the Pan controller (Midi CC 10) Try to draw an 'envelope' of control settings that looks like the picture - going smoothly from all the way left to all the way right twice during the 23 measures. The purpose of this exercise is to do this so you can easily recognize the results. We could also select other controls and automate them, but for this purpose we will concentrate on PAN.
Now that we have drawn the sequence of PAN events, let's view the sequence that we have created. Right click anywhere in the matrix and then select 'Edit in List Editor'. This will bring up a list of the Midi events that are in this sequence. Note that all of the Events are sequence by Measure, beat, and ticks in time. If we had to enter all these by hand, it would have been a chore. Close the List Editor.
 To
help emphasize the movement of the PAN control, we will narrow the Stereo Width
of the Stereo Width of our audio signal. Ctrl-Click and drag the width of the
PAN control (above the volume slider) to a narrow width.
To
help emphasize the movement of the PAN control, we will narrow the Stereo Width
of the Stereo Width of our audio signal. Ctrl-Click and drag the width of the
PAN control (above the volume slider) to a narrow width.
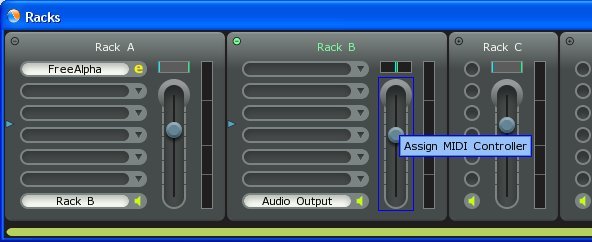
In order for Rack B to respond to the sequence that we will be sending to it, we must assign the PAN control in Rack B to the PAN midi event. This is accomplished by Opening the Rack B Midi Assignment Options. Right Click on the Volume Slider in Rack B. And then click on 'Assign Midi Controller'.
 Make
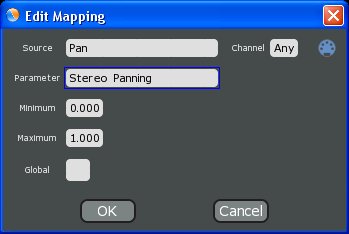
this assignment by clicking on the Source box and then scroll down to the PAN
control source.
Make
this assignment by clicking on the Source box and then scroll down to the PAN
control source.
Then click in the Parameter box and select Stereo Panning as the control to be controlled.
Uncheck the Global box.
Click on OK
Play the tracks and listen to the changes in Pan from left to right and back and watch the Pan control in Rack B as it follows your automation envelope. Then close the Midi Editor.
Now to uncover all the automation secrets of Free Alpha, double-click on the Free Alpha sequence. Then click in the lower left corner of the controller matrix and open the Parameter Tree. Most of these parameters can be automated in the same manner as we just did for Gain. Some of the parameters are not used in the Preset (dark'n basic pad BT), but if you select the Filter Cutoff parameter, and draw in a few deep bumps, you can get some pretty subtle and awesome changes in the tone of the synth. Controllers that are programmed into a VST can be entered into the track along with the sequence of note events. There is no need to set up a separate track since the VST will recognize the input directly.
Here are the steps to using Automation ...
1. Create a sequence clip for the length of the automation.
2. Designate the Rack and/or Target to be automated by selecting the Rack target..
3. double-click on the new sequence clip.
4. Click on the lower left corner (controller name)
5. Select the parameter to be automated from the parameter tree for this target.
6. use the pencil tool to draw the levels of the selected parameter into the
controller grid.
Once this is completed, you can close the edit window for the sequence clip
7. If the target is the Rack controls e.g. Volume and/or PAN, right click on the Volume Control and assign the Midi Event.
That's it.