For the PC simply download the file - mulab-win.zip - to any
directory on your hard disk.
For the MAC simply download the file - mulab-osx.zip - to your download
directory on your hard disk.
Typically, this is achieved by using your internet browser e.g. Internet Explorer or my personal favorite, Mozilla Firefox, to go to WWW.MUTOOLS.COM.
At the top of the page there is a heading - Downloads - Click on this link and you will be presented with a down load page. Under the heading Download , there are two entries:
Mulab for OSX
Mulab for Windows
Now you must choose, based on your operating system, either OSX (MAC) or Windows (PC). Right Click on the link of your choice - the menu appears and choose either Save Target as ... or Save Link as .... This will then popup a box in which you need to select the folder on your computer where you will save the installation file MULAB-win.zip or MULAB-osx.zip). After choosing your favorite directory to store downloads, click on the SAVE button - the file will be downloaded to the directory of your choice.
TIP: Since I download many applications (on my PC), I have a Directory name DOWNLOAD with sub-directories for MUSIC, OFFICE, UTILS, DOCS, etc. I download the appropriate files to one of these sub-directories. When the DOWNLOAD directory gets up to about 600MB or so, I simply copy the whole thing to a CD (along with an index which is saved on my hard disk) and then clear the directory so I can start over. This allows me to manage a large number of downloads over the years.
So you must remember where you put the download. If you are just lazy or don't care, it probably went into My Computer or the Desktop. But in any case it is time to locate the file because you are going to double click on it to get the installation of MULAB Free going.
For the PC:
Find the file in your explorer window (or on the desktop. If you have a ZIP utility, such as WINZIP, you are in luck because the utility will take over and ask you where to install the MULAB studio application. Just double click on the file - MULAB-free-win.zip. You will be asked to extract all the files to a default location, probably C:\Program Files. This location will work nicely.
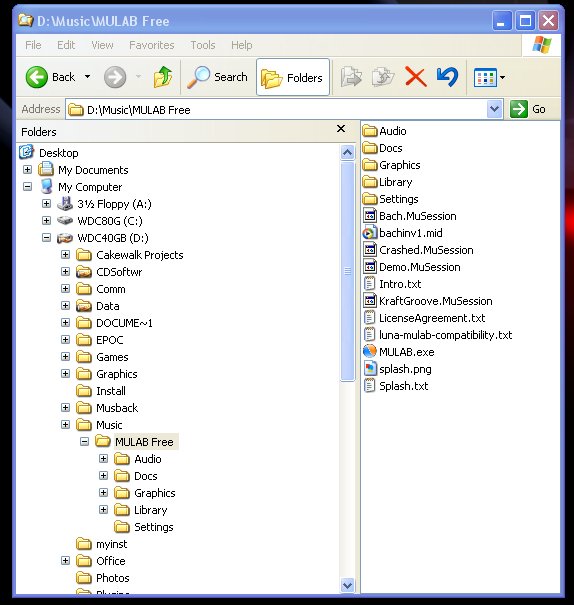
TIP: Again, since I have many Music Applications, I have created a folder named \MUSIC and store almost all of my installed music applications here. This allows me to locate their associated files more easily. And also when I back up my music files, I need to only back up everything stored in \MUSIC. For example, I selected D:\MUSIC as the installation point for MULAB. After the installation, all of the files for MULAB were stored at D:\MUSIC\MULAB.
After extracting the MULAB Free files from the installer Zip file (from MULAB-free-win.zip) the unzip process will create a sub-directory structure headed by a Directory named - MULAB Free. Under this directory, the installer will have placed the files necessary to execute and support the application. e.g. MULAB.exe, etc. along with 4 other sub-directories. If your installation does not look like the explorer window (here) then you have not extracted the files properly from MULAB-free-win.zip. If it looks like this then please continue.
Locate the file MULAB.exe in the MULAB Free directory. Right-click on MULAB.exe and drag to your desktop. Upon release choose the menu item 'Create Shortcuts Here'. This will create a shortcut on your desktop to use whenever you want to run the MULAB Free application.
Optional: A highly recommended addition to OSX, is the JACK OSX audio server. This serves the same purpose as ASIO on the PC and will lower the latency time for tighter response to audio performance on the MAC platform. If you choose to use the JACK Audio server, you will be rewarded with much better response to midi commands and to changes applied to audio signals through effects. The use of this server is fast becoming a standard for OSX audio applications and is also supported by MULAB Free, so it will make a good addition to your audio software arsenal. The installation of the server is very straight forward and can be easily and quickly accomplished by downloading the package from JACKOSX.COM . The package will be installed automatically and will create an applications folder for Jack. Inside the folder is the JackPilot program for starting, stopping and configuring the Jack OSX server. The Jack OSX server must be started and running before it can be used in any audio application and that includes the MULAB Free studio. Use the JackPilot program to start the server before starting MULAB.
For the MAC, Ctrl-click on the Mulab icon and drag it to the desktop.The first time that MULAB is run, it will walk you through a few setup steps to identify your audio and midi ports.
Double-click on the desktop shortcut for MULAB. The first time you will get a display regarding the license for MULAB. Click on the button labeled - I Agree. Then read the Intro screen and click on the button labeled - OK.
 The
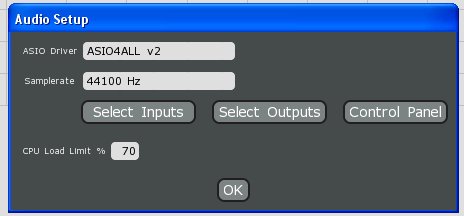
next setup screen is used to set up your Audio ports and name the
Windows ASIO driver to be used. If your system has more than one ASIO
driver, click on the name of the ASIO driver to reveal other drivers
and select the one you want to use. Then click on OK (dont worry about
ASIO inputs and outputs since these have all been chosen for you).
MULAB does not use DirectX or MME outputs, so don't be looking for
these. The only Audio ins and outs are through the ASIO driver. If you
don't have an ASIO driver, you are not out of luck. Just go to http://www.asio4all.com/
and down load the ASIO driver. This driver is universal. It really
works and it provides excellent throughput.
The
next setup screen is used to set up your Audio ports and name the
Windows ASIO driver to be used. If your system has more than one ASIO
driver, click on the name of the ASIO driver to reveal other drivers
and select the one you want to use. Then click on OK (dont worry about
ASIO inputs and outputs since these have all been chosen for you).
MULAB does not use DirectX or MME outputs, so don't be looking for
these. The only Audio ins and outs are through the ASIO driver. If you
don't have an ASIO driver, you are not out of luck. Just go to http://www.asio4all.com/
and down load the ASIO driver. This driver is universal. It really
works and it provides excellent throughput.
For the MAC, just take the default core audio device.

Near the upper left corner in Mulab, click on the Edit button. This provide access to Audio Setup (above) and Midi Setup.
Midi Setup is a list of midi input ports and output ports. By clicking in input port 1, you can choose your MIDI IN port - normally you have connected your keyboard controller here. By choosing the midi output port 1, you can set the port where your default MIDI OUT goes. If you want to use more than one output port, you can designate any other output port that you may want to use, by clicking in output port 2, etc. Then click on OK. (Note: Mulab Free is limited to a single MIDI IN/OUT port.)
 If you skipped over these,
or want to go back and make some changes, you can click on the EDIT
button (upper left corner) of MULAB and choose Audio Setup or Midi
Setup.
If you skipped over these,
or want to go back and make some changes, you can click on the EDIT
button (upper left corner) of MULAB and choose Audio Setup or Midi
Setup.
OK, you are done. The MULAB system is installed and setup to use your midi and audio equipment.
If you are opening MULAB for the first time, you should be presented with a demo session. This will allow a quick look at some of the capabilities available in MULAB. If this is not the first time, then you must click on the FILE Button, click on Open Session and then navigate to the MULAB folder and highlight one of the MuSession files and then click on OK. This will load the Session. NOTE: current demo files may appear different.
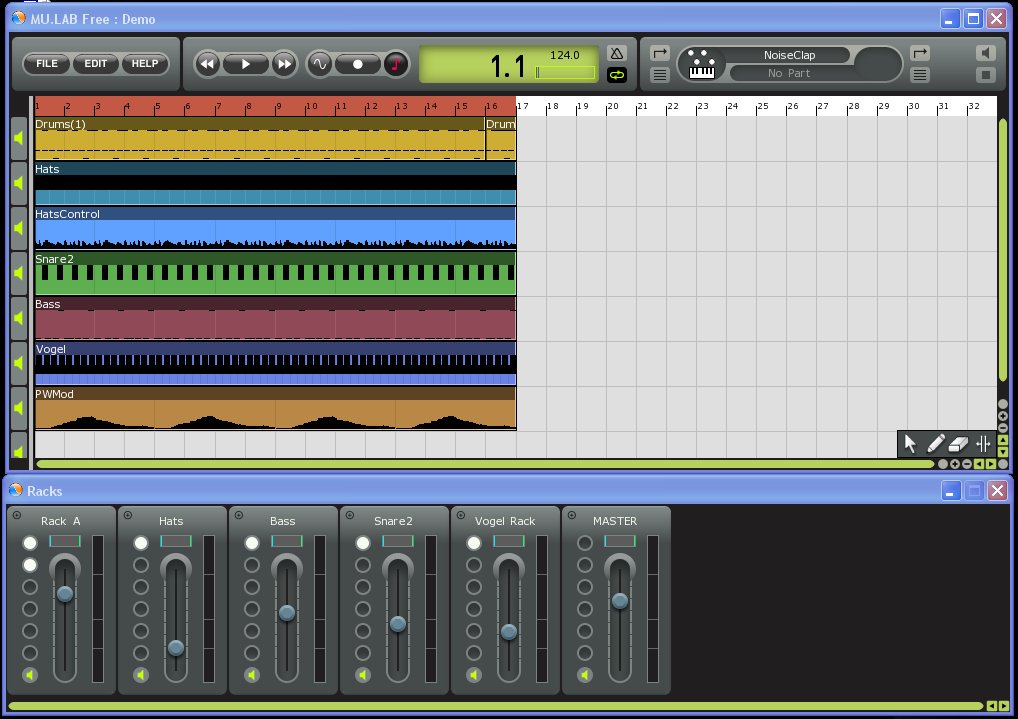
This is the two main work areas that display the current composition.
The top window (known as the composition area) contains tracks of audio or midi data that can be directed to instruments and effects located in the racks window below. In the demo.MuSession the racks have been populated by instruments created using the built in MuSynth.
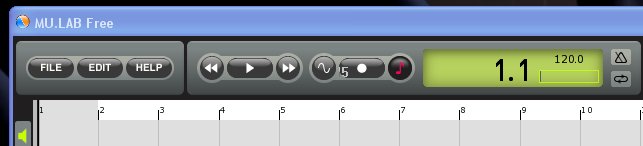
At the top of the display is the transport controls. The little triangle represents the Play/Stop button. Click on the traingle to start play of the Demo. Click again to Stop the play. The double triangles are for fast forward and fast rewind of the play position. Or you can click in the bar numbers area to quickly move the play position to that point. The space bar can be used to stop and start playback.
If you do not hear any music at this point. You need to go back and check what has been done so far. Make sure your Soundcard is not muted and that the volume slider is up especially for the audio outputs.
To Exit from MULAB, click on the X in the upper right corner or click
on FILE and then click on Exit. You will be given a chance to save your
work as a Session. So all of your tracks, Racks, etc. will be saved
exactly as you left them. There are three choices:
Quit Without Save - the session and any changes are lost; the
previous session remains as is
Save Before Quit- the session is saved as it now exists; previous
session is overwritten
Cancel - Just forget it, I am not ready to quit.
Studio software (MULAB) must be downloaded (the setup file). Then it must be installed into a working folder. Remember where it is installed because the location is sometimes referenced in relation to other music files, e.g. Session files, WAV files, Presets, setup files, etc.
Once the music software is
installed, there are usually two setups that must be specified:
If the software uses Plugins, you will have to identify the location of the Plugins Folder(s). Some music software programs include internal instruments and effects so that plugins may not be required. MULAB includes many internal instruments and effects but also allows the flexibility of adding VST plugins.
If the Demo song does not play, go back and check your work.
Basics - traditionally, computer objects (files, modules, windows, etc.) have been broken down into 2 major categories - Programs and Data. Any Digital Audio Workstation (DAW) must deal with programs and data so as to process the data and produce a resulting digital Data file that is consistent with Digital Standards e.g. CD or MP3. Each DAW does this in a little bit different manner, depending on how the program was designed and the objectives of the software designer.
Programs contain instructions that direct the computer to perform a process. These are sometimes called executables. In an audio processing environment we can categorize objects like Hosts, modules and plugins as programs. These objects contain instructions that the computer will follow to process the Data objects (which contain no computer instructions). Within MULAB, the programs are arranged in Racks and as modules in the Session Modular Area (for more advanced detailed arranging). By arranging the programs in a specific sequence, the computer musician can direct the computer to process audio data in a specific manner. For those just getting started with MULAB, the RACKS are where the programs can be placed quickly and easily. By themselves, the RACKS do nothing until they are supplied with Data.
Data consists of a sequence of binary or text information that can be processed by a program. In an audio processing environment we can categorize objects such as WAV, MP3, MIDI, OGG, etc. typically stored in files on memory devices. Within MULAB, these objects can be loaded onto TRACKS in the composition area and then arranged in the order that they will be sent to the RACKS for processing. For convenience, the TRACKS can be broken into PARTS for ease of arrangement. Digital Audio data (WAV) can be placed into a PART on a TRACK. The TRACK is then directed to send its PARTS Data to a Target Module, which can be a RACK or a specific module within a RACK that is looking for digital audio data to process. Other TRACKS may contain PARTS with midi styled data (event information). These TRACKS/PARTS are directed to RACKS that contain programs that have been designed to process midi styled information. Right click the Track header to choose the Target Module (RACK) for data on this track.
In summary - TRACKS contain data to be processed. RACKS do the processing. The combined processing produces digital Data file(s) that can be sent to a hardware audio interface that will convert the digital Data to an analog (electrical ) signal to be processed by amplifiers and speakers.