MULAB Free - MIDI Recording
MIDI recording
Recording from a midi device can be done from a midi controller which generates
a binary stream of midi events. Or in the case of most studio programs, you
can enter the midi events yourself one at a time in what is known as 'step entry'
in a MIDI Editor. In the former case, the software proceeds at a fixed rate
- the established Beats Per Minute (BPM) - and notes and controller signals
are sent in time from the midi controller to the software where they are recorded
as they arrive and placed in a list of events. If you don't have a controller
to generate the binary data for these events you must resort to step entry.
You pick the exact time to place the event; describe the type of event; and
enter the values that needed to fully detail the event e.g. pitch, velocity,
strength, channel, patch, bank, etc. The result is called an event list and
in most software (because of the format of a midi file) is separated into a
separate list of events for each channel.
A list of midi events can be called a sequence (and is so named in MULAB).
A track may have a single sequence (clip) or the sequence can be broken into
multiple clips. Each clip can be programmed to respond to specific channel or
to all channels.
Most midi equipment and software is created to handle 16 channels of midi data
for each port. There may be more than one port which allows for more channels
e.g. 32 or 48 or more. When defining the MIDI Input ports to audio software
(like MULAB) each input port that will be used must be defined in the setup.
Ports that exist, but are not defined, will not be available.
In most Midi files, an instrument (patch) is assigned to a channel, but this
is not a hard and fast rule. The instrument can be changed as often as needed,
however for practical reasons (as you will see) it is not easy to change a VST
Player in mid-stride unless provisions for this have been established by the
VST module. In MULAB you can further assume that each MIDI track, known as a
sequence, will be assigned a specific player. Some players have the ability
to detect 'patch changes' but this depends on the VST features built into the
VSTi module. Most hardware synths can are built to detect patch changes and
are polyphonic (accept and play multiple sounds at once).
One other idiosyncrasy is that a common set of rules, called General MIDI specifications,
has been published (for many years) and most midi gear and software now adhere
to this spec. Certain Bank and Patch numbers have been assigned to specific
instrument sounds and channel 10 is reserved for drums. Most VSTi modules do
not adhere to the General MIDI spec. But you will probably hear about General
Midi (GM) from time to time.
Connecting a MIDI Keyboard
Make sure your MIDI keyboard (or other controller) is turned on and connected
to the MIDI input port defined earlier to MULAB as the MIDI IN port. If you are
not sure how to do this, your equipment guide should be able to tell you. Here
are some general guidelines:
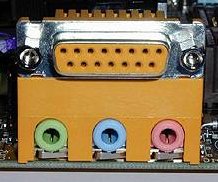 GAME
PORT: Many soundcards are equipped with a 15 pin 'game port'. This usually
doubles a MIDI INPUT/OUTPUT port. To use this port, you must acquire an adapter
cable that connects the game port to your keyboard. In this case the MIDI OUT
port on your keyboard must be connected to the cable/adapter marked MIDI IN.
Get it? The MIDI OUT signals are sent to the MIDI IN place on the computer.
This is the MIDI input port defined to your software.
GAME
PORT: Many soundcards are equipped with a 15 pin 'game port'. This usually
doubles a MIDI INPUT/OUTPUT port. To use this port, you must acquire an adapter
cable that connects the game port to your keyboard. In this case the MIDI OUT
port on your keyboard must be connected to the cable/adapter marked MIDI IN.
Get it? The MIDI OUT signals are sent to the MIDI IN place on the computer.
This is the MIDI input port defined to your software.
TIP: Voyetra sells a Game Port/MIDI Adapter cable available at most
large computer stores for about $20. If possible, try to find at least an 8ft
cable so that you can maneuver your keyboard to a comfortable spot.
 MIDI
PORTS: Many other sound cards are equipped with a standard MIDI IN and a
MIDI OUT port. For this, you need a MIDI cable with a 5 pin standard MIDI connector
on each end. The cable is wired so that each end is a male connector and are
unmarked, so they work either way. The trick is to connect the MIDI OUT from
your Keyboard to the MIDI IN port on the sound card. Once connected, you should
label the cable end e.g. KEYBOARD MIDI OUT and the other end COMPUTER MIDI IN.
This way there will be no confusion if you have to disconnect the cables.
MIDI
PORTS: Many other sound cards are equipped with a standard MIDI IN and a
MIDI OUT port. For this, you need a MIDI cable with a 5 pin standard MIDI connector
on each end. The cable is wired so that each end is a male connector and are
unmarked, so they work either way. The trick is to connect the MIDI OUT from
your Keyboard to the MIDI IN port on the sound card. Once connected, you should
label the cable end e.g. KEYBOARD MIDI OUT and the other end COMPUTER MIDI IN.
This way there will be no confusion if you have to disconnect the cables.
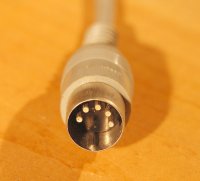 This
is a MIDI Cable
This
is a MIDI Cable
TIP: These cables can be obtained from any reputable Music store that
handles electronic music instruments. They run about $12 for a 10ft cable and
are all wired the same. Guitar Center always has a good supply of MIDI cables.
If your Keyboard also contains a synthesizer (it makes sounds on its own), It
probably also has a MIDI IN port and can be used as an external synthesizer.
Buy two cables - they are sometimes sold in pairs. Or make your own cables -
Instructions.
USB MIDI: Newer MIDI Controllers can be powered by USB and the USB cable
also provides a path for the MIDI IN and MIDI OUT signals. If your Keyboard
controller has a USB port, there will probably be a CD disk with the MIDI drivers
for the Keyboard. This driver needs to be installed in order for the ports to
be activated (recognized by your OS) and then selected as a MIDI Input device.
Install the driver, then connect the keyboard with the USB cable. The device
will then appear in a list of MIDI ports to be selected by your software. WARNING:
The device is not available unless the driver is installed; The keyboard
is connected; and the Keyboard is turned ON.
TIP: Although the USB approach seems to be the
state-of-the-art way to connect your keyboard, it is not a permanent
port, so without the keyboard connected, you may experience problems
when your software fails to find a port. Also this is a rapidly
changing technology with new 'driverless' USB adapters, wireless
connections, etc. being introduced. Check the keyboard manufacturer
site to look for updated drivers for your USB MIDI Interface. The
latest Midi Controller Keyboards are 'Plug n' Play' i.e. no driver is
required as they adhere to common USB drivers provided with the
Operating System or embedded in the hardware.
Recording a MIDI track
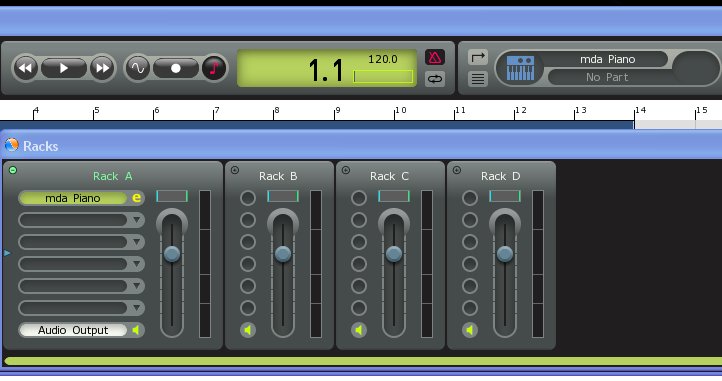
 Start MULAB and click on the new session button. This gives you a clean
slate to write on. Click on a slot in Rack 1 and load the mda
piano VSTi plugin into Rack 1. Track 1 will be directed to this Rack as
a target. Your keyboard Controller probably is set up to send on
Midi Channel 1 (The default for Rack 1). If not so, you can
select the correct Midi Channel by right click on the track header for
the mda piano.
Start MULAB and click on the new session button. This gives you a clean
slate to write on. Click on a slot in Rack 1 and load the mda
piano VSTi plugin into Rack 1. Track 1 will be directed to this Rack as
a target. Your keyboard Controller probably is set up to send on
Midi Channel 1 (The default for Rack 1). If not so, you can
select the correct Midi Channel by right click on the track header for
the mda piano.
Now, play a few notes on your keyboard. You should hear the piano at the Audio
output and you should see the level indicator light up in the Rack mixer strip.
If you don't see this, something is wrong with your setup and you need to fix
it before going on. Reread the section above about connecting your keyboard
controller.
To
begin recording a midi sequence, you must first setup for Midi Recording
On the transport bar: The midi record indicator must be red (a picture of a
tiny note).
- The measure number is 1.1 (click rewind or position to a measure that your
recording will be entered.)
- The BPM is set to your liking
- The metronome icon is red. (Click it until it is red)
You are ready to record:
 Press the Record Button (circle above the little midi record indicator). You
will hear the metronome count off 4 beats then on the next beat begin playing
in time to the metronome. When you are finished, click on the start/stop arrow.
The program will request that you enter a name for your midi sequence. YOU MUST
ENTER A NAME. If you press Escape or press Enter without naming the midi sequence,
it will be discarded.
Press the Record Button (circle above the little midi record indicator). You
will hear the metronome count off 4 beats then on the next beat begin playing
in time to the metronome. When you are finished, click on the start/stop arrow.
The program will request that you enter a name for your midi sequence. YOU MUST
ENTER A NAME. If you press Escape or press Enter without naming the midi sequence,
it will be discarded.
If your track was selected, a representation of your midi sequence will appear.
Otherwise a new track will be created to hold your sequence. You can click the
rewind (double arrow left) and back up to the first measure or click on a specific
measure to position the play and then Click on the start/stop button to hear
your midi sequence played back.
Note: A quick way to record is just punch the record button - new track will
be created as you play to hold your new sequence.
If you are not satisfied with the recording, then simply click on the track
- it will darken. Then press the delete key - Poof, it's gone.
Rewind to the beginning and click on the record button to start recording again.
If you decide that some parts of the recording are worthwhile keeping, the
just mute the track (click on the little speaker to the left of the track),
rewind and click on Record button to lay down a second track. At the conclusion
of assigning another name to the new midi sequence, a 2nd track will appear.
You can play the tracks you want by muting those you don't want to hear. It
can be confusing to listen to a previously recorded track while recording a
new track.
Step Editing
 MULAB
Free MIDI Editor
MULAB
Free MIDI Editor
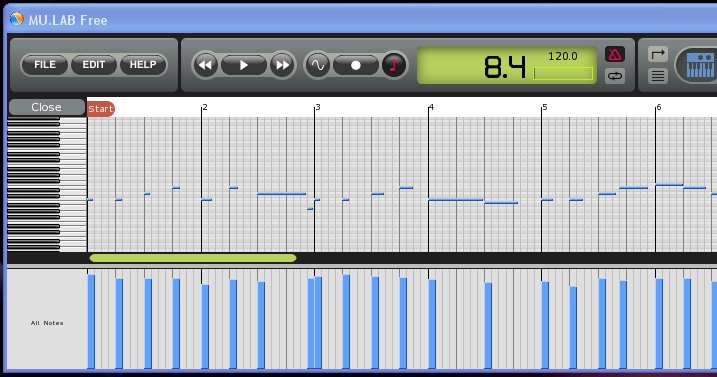
Double-clicking on your midi sequence will open the midi editor.
This is known as a step time editor. All of the notes are displayed on
a grid as if in a piano roll. The vertical axis on the left is
representative of pitch or keys on a keyboard. The horizontal axis
represents time expressed in measures and beats. The beats can be
broken into 1/64 note time intervals. By examining your notes, you can
tell if the timing is correct. You can zoom in or zoom out on this grid
by using the +/- buttons at the lower right of the grid. It is very
helpful to zoom in on the grid making the notes larger to more
precisely position the notes. Right click on this display to reveal a
menu of options. You may want to set the Grid size for this Part to a
more appropriate setting for entering notes (snap to option).
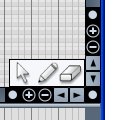
- Click on the center of a note to move it horizontally or vertically. (The arrow tool)
- Click on the left edge of a note to extend it earlier, right edge to extend it later. (The pencil tool)
- Ctrl+click on the edge of a note to delete it.
- double click and drag right to insert a new note.
Beneath the note display is a note velocity display. The vertical bars represent
velocity (strength) of each note. You can adjust the velocity of a note by dragging
the vertical bar directly beneath each note.
If you have recorded multiple tracks and have some good and bad parts and want
to make one track that contains all the good parts, there is an easy way to
do this. It is called cut and paste. You will use your special keys to delete
bad sections of the midi sequence; copy good sections of the midi sequence;
and paste the good sections where the bad sections were. It's like this:
1. With the arrow tool, drag a window around the bad notes to be removed. The
notes will be darkened. Press Ctrl/X (Cut).
2. With the arrow tool, drag a window around the good notes to be used. The
notes will be darkened. Press Ctrl/C (copy).
3. place the cursor on the measure at the beginning of the notes to be pasted
(a vertical line appears). Press Ctrl/V (paste).
NOTE: You may move between multiple tracks in between cutting and pasting.
Simply close the editor on one track (Close in the upper left corner) then double-click
on the other track to be worked on to get back to the editor.
TIP: If you make a mistake and cut or paste the wrong notes,
just click on the EDIT button in the upper right corner and select the Undo
operation. You can step back in time by Undoing many operations in reverse sequence.
So if you messed up, Undo is there to right your wrongs. You can also Redo if
you got carried away with the Undo. Check it out.
TIP: If you don't have a keyboard and you want to
enter midi notes one at a time using the step editor, it is certainly
possible. Choose a target from the Window at the upper right. Choose
the pencil tool click on an empty track in measure 1 and drag to the
right as many measures as you want to start with. Then a prompt appears
and choose - Sequence. New. This establishes a MIDI Track. Double-click
on the track and you will be presented with a blank grid to work with.
Use your mouse to enter notes by double-clicking and dragging to the
right. Alt+click let's you also listen to the pitch of the note.
Extended MIDI Edits
 MIDI sequences can be
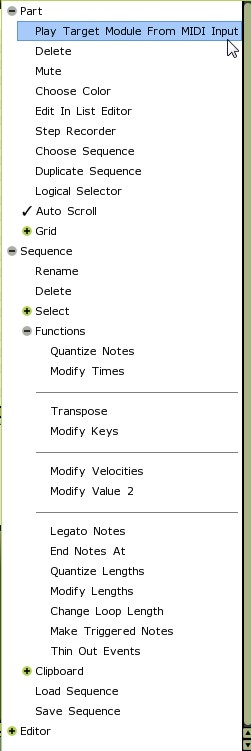
altered in more ways than discussed above. By right clicking on the grid
in the MIDI Editor, a sub-menu becomes available for additional operations on
the midi data in this sequence.
MIDI sequences can be
altered in more ways than discussed above. By right clicking on the grid
in the MIDI Editor, a sub-menu becomes available for additional operations on
the midi data in this sequence.
Edit in List Editor - For precision the details of each note in the sequence
is listed and subject to modification.
Grid - Allows for 2,3,4 beats per bar and sets grid division
as fine as 1/64th notes.
Rename - Change the name that appears for this sequence
Delete - Delete this sequence
Quantize Notes - Set notes to start at Grid lines
Modify Times - Change the start time of an event
Transpose notes - Select a group of notes, then click transpose and type the
number of steps to transpose the selected notes up or down
Modify Keys - Change the musical key of a sequence
Modify Velocities - Change the strength of Midi Note events
Modify Value 2 - Change thefirst Parameter of all events selected
Legato notes - Select a group of notes, then click legato. Notes are extended
to end when the next note begins.
End Notes at - End selected notes at a specific Bar, beat , tick
Quantize Lengths - Set the duration of notes to the grid
Modify Lengths - Change the duration of notes
Change Loop Length - Change the length of a looped sequence
Make Triggered Notes - Removes duration from a note event (Note Note Off event
sent)
Thin Out Events - Set a maximum interval beween controller events.
Load Sequence - Load a saved sequence from a disk file
Save Sequence - Save a named sequence to a disk file.
Editor>Zoom selected - Select a group of notes, click on Zoom Selected to maximize
the grid
Recording a MIDI track with an Audio Track
The metronome really sucks. There are thousands of audio loops available and
we may even want to use a few in our composition. One of the options is to load
a backing track from an audio library into MULAB and use the track as a timing
track in order to record a midi sequence at the same speed. As in most studio
programs both midi tracks and audio tracks are supported. (In MULAB the tracks
are either Sequence Parts or Audio Parts.). So let's go ahead and load an Audio
file into a new session and then lay down a MIDI Track using the Audio as a
timing track instead of the Metronome. Download this 2MB audio file - 120primitive.wav
- and save it in the MULAB Free folder. Right click on this link and select
Save Target as .. or Save Link as .. (Review Lesson 1 if you don't know how
to do this.)
Open a new MULAB session by either clicking on FILE button and selecting new
session or restarting MULAB and clicking on new session button. With a blank
composer page, double-click on measure 1 of an empty track,
drag the outline of a part all the way to the start of measure 13 (thru 12 bars).
Then select Audio part from the popup. This will open an explorer window. Search
for the file 120primitve.wav. When selected, the file will be auditioned. Open it by highlighting it and clicking on
OK. You will see the representation of this audio file by its outline on the
audio track. This was recorded at 120BPM.
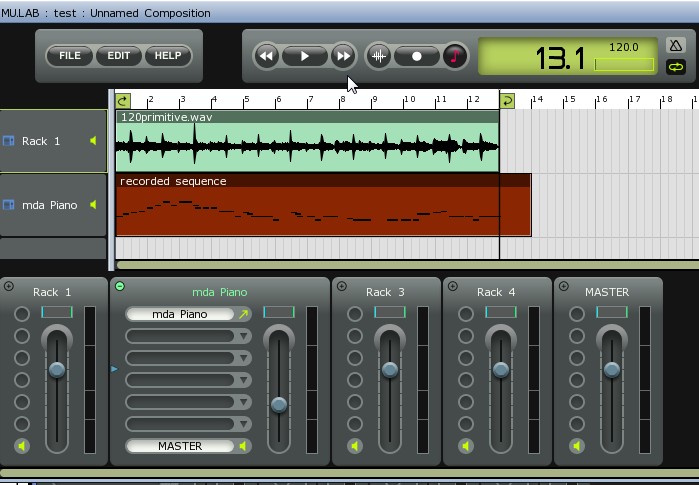
Right click on the track header and select the target as Rack 1.
(This connects the Audio track to the Audio Output and provides a path
for adding effects if any are needed.) You can control the volume of
the Audio track using the Slider on Rack 1. Play the track
through a couple of times to get the rhythm of the track then click on
start/stop arrow to stop the play. For convenience, you can set
bars 1 - 12 to loop by right clicking on the bar number area and
setting the loop start and end. Turn on the loop by right click on the
loop marker or clicking on the loop indicator under the metronome
icon.
Load the mda piano VSTi into a slot in Rack 2. You should now hear your midi keyboard playing the piano..When you are ready to record, turn the loop off.
Right click on the little note on the transport bar to setup midi record options. e.g. grid settings.
To record:
- The midi record indicator must be red (a picture of a tiny note).
- The measure number is 1.1
- The BPM is set to 120 BPM - The audio track was recorded at 120 BPM
- The metronome icon is grey - we do not want to hear the metronome.
- Your midi track header should be selected (This is the target where events will be recorded).
Are you ready to record? Click on the Record circle. Listen for 4 beats of
the metronome and the play along with the audio track. After 12 bars, click
on the start/stop arrow. Give your track a name. You now have a midi track that
will play along with an audio track. You can play this and listen for clinkers,
then double click on the MIDI Sequence to correct any errors.
Summary:
MIDI events are binary signals that describe musical events and can be transmitted
from one device to another. They act as commands that direct sonic devices to
act according to the commands received. Synthesizers are programmed to respond
to midi events.
MIDI events are in sequence in a list and can be recorded in time from events
transmitted by a midi controller or by entry in step time.
Each midi track is a sequence of midi events and is assigned to a specific
target. A target may be a hardware synth or a VST (mixing strip).
MIDI cables connect your Keyboard controller to your computer MIDI IN port
- either a midi cable or a USB cable.
To Record, make sure a Rack target is selected; set the measure to the beginning
of a track and with the little midi note lit, press the Record button. Press
the Start/Stop to end recording and give the sequence a name.
Double-click on a track to edit your sequence.