In most music composition systems you have multiple tracks. Each track may represent an instrument, a sequence, an effect or an automation sequence. The trick is to balance each part of the music composition so that it sounds best. In most music composition systems each track will be represented in the Mix with its own set of controls. Each track can have its own set of controls - sometimes known as a channel strip. These controls can include Level (Gain), Pan, EQ, and other effects. Level to prevent any track from overpowering the rest or conversely to bring the main instrument into focus. Panning gives music much depth and refers to the stereo position of each part in the Mix. This can be controlled in a stereo environment by moving the Pan control so that the signal is routed proportionately to the left or right audio output. Some music development systems offer built-in effects such as reverb for each instrument. All of these nuances affect the finished product. Mixing is all about the arrangement of the tracks and the interaction of each of the tracks.
The object of mixing is to create an audio file that sounds right.
Using a Digital Audio Workstation will create multiple tracks that are each processed separately. Placing them together and balancing the overall presentation is what mixing is all about. In this tutorial we will be just scratching the surface, but will present some features that can get you started on completing a musical piece.
For simplicity we will take some ready made loops and assemble the pieces into a single musical piece by mixing the pieces together. The loops used here are WAV file samples that were distributed on the June 2006 CD of Future Music Magazine. They are royalty free samples that were created by Big Fish Audio.
If you want to follow along, there are only 4 WAV files involved - each about 4MB in size. They can be downloaded from here:
Clav loop
Drums loop
Ensemble loop
Rhodes loop
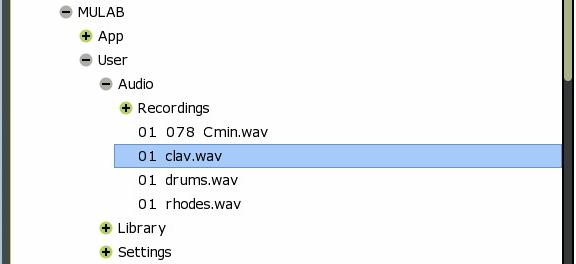
These Audio files are called loops because they begin and end on a bar boundary at a given tempo and can be easily integrated e.g. there is no hesitation or glitch at the beginning or ending of the loop and they can be played using the looping features of a DAW. Download them and place them in your MULAB Free folder (or any folder that you want set up for storing WAV Samples).You may store these anywhere on your hard disk, in this demo case the files were downloaded to Mulab\User\Audio\Recordings folder.
NOTE: To make MULAB more portable, files and settings that are stored under the User folder can be recognized by symbolic addresses. So MULAB sessions can be run from various disk locations provided the files are also transferred. If you locate these files in the Mulab\User\Audio\Recordings folder, you can load and run the Mixing Demo session. that goes with this tutorial.
Listen to the Mix that was created in the above example (MP3)
Begin by starting MULAB with a New Session. Save your session as a named Session. This establishes a relationship between the project session and all files, clips, sequences, plugins, etc that will be used in the session. If you haven't downloaded the WAV file Loops (above), do it now.
Tip: For performance reasons, if you have a 2nd hard disk available, it is recommended to store audio files on another disk separate from the programs. This buys you a small performance gain.
Set the tempo for the session to 78.(Tempo for these recorded clips is 78BPM). Double click on the tempo number in the transport bar. This sets the overall Session Tempo. Optionally, you can right click on the Tempo and then select insert Tempo. A dialog box will allow you to insert a tempo change at any position in the mix i.e. 1.1.0000. Tempo is an important ingredient, especially if you are mixing midi events and audio clips. By syncing the tempo, the DAW will sequence events at the same rate that clips were recorded. This also allows clips to be 'grid' located using the snap feature - another method of controlling the exact arrangement of your music.
Tip: To control the grid setting, right click on an empty area of the Composition. Select Grid>Choose Grid. This will allow you to set the snap grid setting. For this Mixing tutorial, setting the Grid at Bar will sync all of these clips on bar boundaries.
 Creating a Mix from Sample loops
Many songs can be constructed by following these steps
MULAB provides an audition tool to listen to audio clips before selecting them into a mix.
- To add a loop, use the pencil tool and drag an approximate size for the loop (Double-click and drag to the right).
When you release, select Audio file>open and browse for the loop to be loaded.
- Listen to a few samples and loops to decide what goes together
and how it can be made to sound decent.
- Click on the name of an Audio clip to listen to the clip. Click again to stop Play.
- Pay attention to the BPM for each sample loop, if you are using recorded licks.
- Audio Loops can be placed anywhere, on any track, but eventually
you must consider a Rack to handle Volume and PAN.
- Double-click to load the loop into the track or click on OK.
- If the length needs to be adjusted, drag the edge of the loop to fit.
- Drag the clips along the track and/or copy some of the loops to create the
parts. (Discussed in more detail below)
- Assign each track to a Rack strip.
Now comes the iterative part. Play the mix and decide where each track fits best and which parts need to have separate levels and/or need to be panned. Recorded licks are usually pre-adjusted for this, so there may not be much need to mix each individual track - or assign each track to a separate mixer strip.
If the samples are not up to par, the next step is to add a few effects to the Mix. For clarity and brevity, this example uses no effects. (Some effects were obviously used in recording the audio samples to begin with).
Note: There are many ways to create a mix. We could just as easily had several sequences that are routed to VSTi mixer strips which also must be balanced mixed with several audio files used as a background.
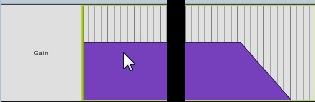
Each audio file was used in its entirety. Clips can be moved anywhere in the composition. Simply place the cursor over the clip and find a position where it becomes an arrow. Then drag the clip to a new starting location.
To adjust the length of the clip at either end, place the cursor near the end of a clip, it will become a pencil and then you can extend or shorten either end of the clip. The start point can be very precisely specified (see Advanced).
To copy a clip into another position in the mix, make sure that the cursor is an arrow. Press the CTRL key while dragging the clip to the new position - the original clip will remain where it was. The copied clip retains all of the properties of the original clip.
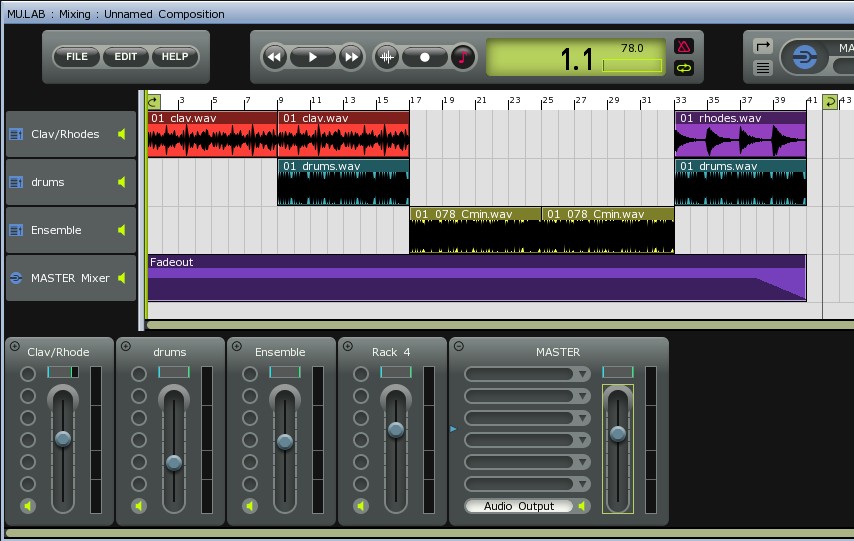
Now, see if you can duplicate the Composition arrangement shown above. This arrangement will reproduce the music we recorded as an MP3 file.
The Mixing strip in each Rack can be automated. This allows a sequence to be directed to the Gain and Pan controls (the Mixer Strip) in a Rack
 To
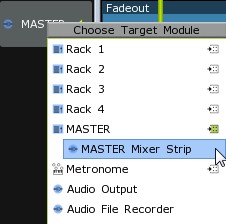
do this, right click on the track header for Rack 4. Select Choose
Target module>Master>Master Mixer Strip. This will direct
the track events to the Mixer Strip controls.
To
do this, right click on the track header for Rack 4. Select Choose
Target module>Master>Master Mixer Strip. This will direct
the track events to the Mixer Strip controls.
Now create a part and a sequence of controller events for controlling the Gain on the Master Mixer strip. Double-click and drag a new sequence for the length of the composition (through bar 40).
Rename the new sequence (right click) and select Rename as 'Fadeout'
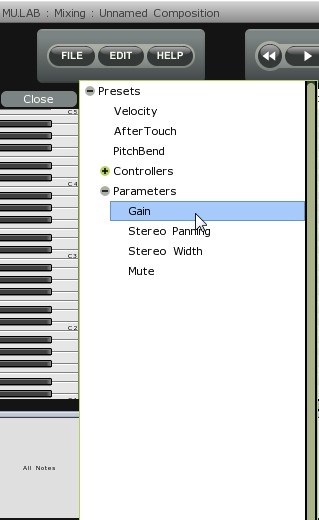
Double-click to open the sequence editor. The bottom section of the editor provides for editing Continuous Controller messages and for parameters that can control mixer strip controls and plugin controls.
As a default it will indicate All Notes as the selected control.
This is where it counts, but is one of the easiest parts of creating music to accomplish. The term rendering means to capture the sound you hear into an audio file that can be reproduced. In almost all cases this means creating a single .WAV or .AIFF file that is at least 44,100 hz and 16 bits and most likely in stereo (two separate tracks in one file). In many cases, this is dependent on the hardware and software capabilities. Many audio musicians like to master at a higher frequency and bitrate e.g. 48K x 24 bits or sometimes as high as 192K. But for a home studio production, CD Quality (44.1K x 16bits) is quite good.
MULAB will output a CD quality stereo audio file. (MULAB UL will also output files with 32bit sample depth).
Once you mix is satisfactory, save the session, so you can reproduce all of your efforts. Click on the FILE button and select Save session as. It is probably wise to save the session under a new name, so that you can get back to a prior mix, if need be. Caution always means making an extra copy.
Once the session is saved, make sure that none of the clips are selected (Double-Click in the grid outside of all clips). MULAB will render just those clips that are selected.
If none of the clips are selected, MULAB will render the entire composition to a WAV or AIFF file.
CAUTION: If you are using a midi hardware synth, you will hear this in the mix, but the output from the midi hardware does not pass through the mixer strips and will not be included in the rendering process. To include this track (or tracks), the output from the midi hardware synth must be recorded as an audio track and added to the mix. (Covered under Advanced).
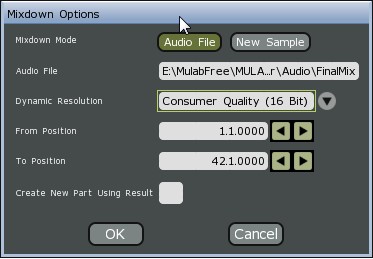 With no clips selected, click on the FILE button and select
Mixdown to Audiofile. Choose a file folder and a file from the explorer
or click new file and enter a name for the audio mixdown. When you click
OK the mixdown will occur and may take a few seconds to convert your project
into an audio file. Once the file is created, you can use almost any media player
to play it; You can burn it to a CD; or convert it to MP3; or to any other format
that is needed.
With no clips selected, click on the FILE button and select
Mixdown to Audiofile. Choose a file folder and a file from the explorer
or click new file and enter a name for the audio mixdown. When you click
OK the mixdown will occur and may take a few seconds to convert your project
into an audio file. Once the file is created, you can use almost any media player
to play it; You can burn it to a CD; or convert it to MP3; or to any other format
that is needed.
Note: The example in this tutorial was Mixed to a WAV file in MULAB and then the file was loaded into Audacity and converted to an MP3 file. Audacity can be used on both the PC and in OSX on the MAC. It also has features for touching up your final mix such as Fade In, Fade out, compression, etc. Quite a useful companion program to MULAB.
MULAB offers the capability of selecting a specific start point within a clip by precisely using the editor. To use this capability, double click on the audio clip to get into the Audio editor. Then select the beginning part of the clip that you will use. Right click at this point and then select start here. A vertical line labeled start will appear.
When copying a clip, sometimes it is useful not to retain the properties of the original clip. If this is the case, press the ALT key when dragging the copied clip. The new clip will have its own properties separate from the original clip.
CAUTION: When altering WAV files in MULAB using the built-in Audio Editor, the file will be permanently altered. So if you plan to use the Audio file again in unaltered form, make a copy first.
The mix is made by routing audio through the mixing strips and setting up controls so that you have enough control over each audio output to balance volume and placement. In some cases, more effects are need to be applied to the overall audio output.
Set the tempo of a project first and save the session before creating your mix.
The result is an audio file that can be played by standard media players. The Mixdown to Audiofile will create the final result - a WAV file or AIFF file - and can be burned to a CD.
The final WAV file can be converted to MP3 for distribution on the Internet or to MP3 players
Please feel free to leave us some comments about this tutorial by contacting the San Diego Music By Computer group.