It is sometimes advantageous to change parameters of the synthesized sound over time - and do it automatically at the exact moment that is required or at a predetermined rate. This can also be done manually by just turning the knobs of the VSTi or mixer strip while the part is playing, but doing this manually can be inaccurate and never as precise as setting the parameter levels into the track ahead of time at precise positions in the piece and being able to set the levels exactly as needed. In LUNA terms this means changing the parameters of the Part Player - which may be a VST synth or effect or a mixer strip. In a few words, you are programming a specific control parameter by drawing in the parameter level over time.
Some VST plugins, do not support automation because they were not designed to make their parameters available to the host program. And some host programs have not implemented the ability to control VST parameters even if they are made available. So the choice of either the host program or the VST Plugin will govern whether you can influence the sound through the use of automation. We are fortunate that LUNA has the capability of controlling VST and mixer strip parameters by entering control events. These events are very similar to control events that are included with MIDI sequences and are also entered in the controller matrix which is found just beneath the note editor in the Midi editor window. The parameter to be controlled (automated) is named in the lower left corner of the Midi Editor window which usually defaults to - Note Events - typically velocity. By clicking on the name of the event, a list of parameter that can be controlled will be displayed. The parameter to be controlled (automated) can then be selected.
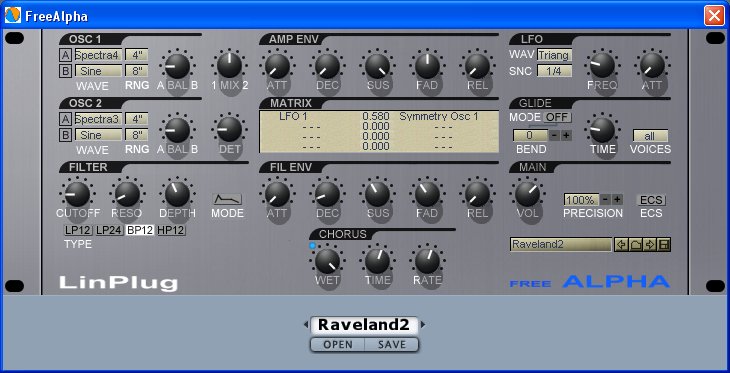
For this tutorial, we will be using another VSTi known as Free Alpha. This is an extremely versatile synth that has been made available by Linplug for both the PC and the MAC. It is capable of creating a variety of electronic sounds that can be used in anyone's music.

To get your very own copy of Free Alpha, click on this link to the Linplug Free Alpha Download page - Then click on the download button on this page and follow the instructions to download your copy of Free Alpha.
If you have been following our tutorial, you will have downloaded the FreeAlpha installer to the Download directory. Now click on the installer and install Free Alpha into your VST directory.
For this exercise, you will be importing a preexisting midi file into LUNA; creating a new sequence track for the automation; and then automating the new sequence track with automation that controls the output of Free Alpha. At the same time we will be demonstrating the ability to route the output of one mixer strip to another.
 For
this demonstration you can use any midi file, preferably a single instrument,
but we have provided a midi file that will just fill the bill and allow a quick
demo of the automation process. So download the midi file - example-automate.mid
onto your machine. Please remember where you downloaded the file to. If it was
downloaded to the Download Directory, then this is where you will be
able to find it when it is imported into LUNA.
Open up LUNA, and import the example-automate.mid file into LUNA. It will probably appear as Track 2.
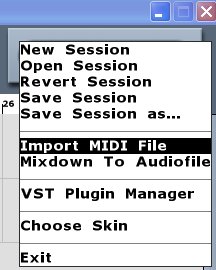
To import this file, click on the FILE Button in the upper right corner of LUNA. The drop down menu will look like this. Click on Import MIDI File and then look for the example-automate.mid file in the directory tree. Locate the file, highlight it and click on OK.
Now as a next step, click on the File button again and this time choose the VST Plugin Manager This will display the existing Plugins available to LUNA. If Free Alpha is not in the list (assumed), then click on the Add VST Plugins button and follow the directory tree to Free Alpha folder or to the FreeAlpha plugin itself, highlight it and then click on OK. This should add Free Alpha VSTi to your VST plugins.
 Now
right-click on the midi sequence track and select Part > Choose Player
> Create New Synth + Mixer Strip. A list of VSTi's will be displayed
and now you can select Free Alpha as the Part Player. A new mixer strip will
appear named Free Alpha. Click on the EDIT Button and select the Raveland2
Preset (On the Free Alpha Synth, the buttons on the lower right, just above
the Free Alpha logo allow you to choose presets).
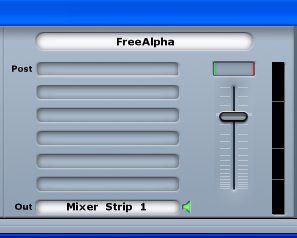
Now we are going to change things around a little bit and route the output of Free Alpha to Mixer Strip 1. The Out box will probably read - Audio Output. This is the default routing for a new mixer strip. However, to illustrate how easy it is to send the output to another mixer strip, you should now click on the name in the Out box, click the drop down and select Mixer Strip 1.
The Mixer strip should now look like this. The output of Free Alpha will now be sent to Mixer Strip 1, before it goes to the Audio Output.
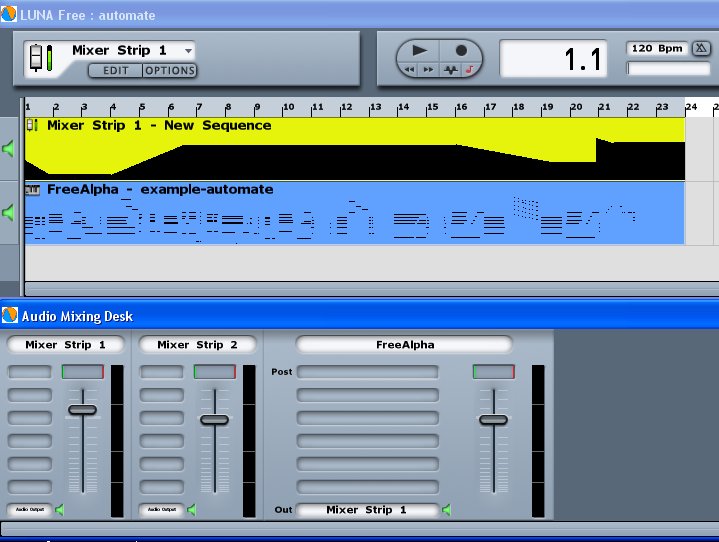
Next, you will need to create the automation sequence. Since Track 1 is not used, use the pencil tool and drag from bar 1 thru bar 24. Then, when prompted, select sequence as the track type. Now right-click on the new track and select Part > Choose Player > Mixer Strip 1. This directs the sequence of automation to Mixer Strip 1.
Before adding the automation, let's hear what the Free Alpha sounds like. Click on the Right arrow in the transport bar and listen to the playback. If you can't hear it, go back and check your work. During playback, operate the Gain control in Mixer Strip 1. You will note that this now controls the overall volume of the audio signal from the Free Alpha mixing strip.
 .
.
So now let's add some automation. 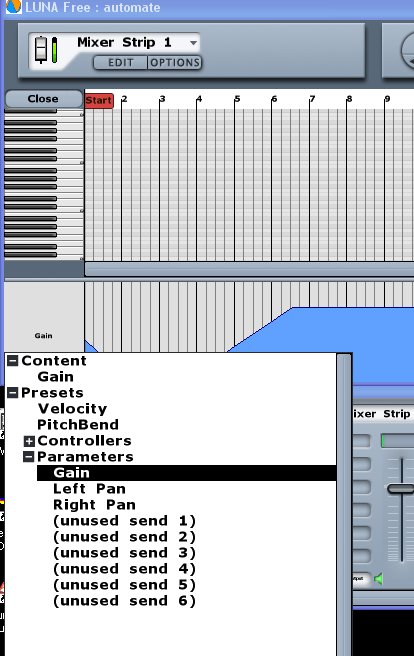
Double-click on the new sequence track. This will bring up the Sequence Editor. The lower matrix of the Sequence Editor is for control automation for both midi control data and VST parameter controls.
Click on the lower left box which contains the name of the control. Typically the default here is Note Events (velocity). However in the case where this Part Player is directed at Mixer Strip 1, you will see that the choices are Gain, Left Pan, or Right Pan. For simplicity, choose Gain (as illustrated). Now the automation entered in the control matrix will affect the Gain of Mixer Strip 1.
You can now use the pencil tool to draw in an 'envelope' that will be translated into changes in the position of the Gain for Mixer Strip 1. In the example here, the Gain starts at about 30%, drops to 10% at bar 2, starts back up at bar 4 and gets to about 60% in bar 6. Follow along by drawing your own Gain 'envelope' .
Play the tracks and listen to the changes in volume and watch the Gain control in Mixer Strip 1 as it follows your automation envelope. Then close the Midi Editor.
Now to uncover all the automation secrets of Free Alpha, double-click on the Free Alpha sequence. Then click in the lower left corner of the controller matrix and open the Parameter Tree. Most of these parameters can be automated in the same manner as we just did for Gain. Some of the parameters are not used in the Preset (Raveland2), but if you select the Resonance parameter, and draw in a few deep bumps, you can get some pretty subtle and awesome changes in the tone of the synth.
Here are the steps to using Automation ...
1. Create a sequence track for the length of the automation.
2. Designate the part player to be automated by selecting the part player.
3. double-click on the new sequence track.
4. Click on the lower left corner (controller name)
5. Select the parameter to be automated from the parameter tree for this part.
6. use the pencil tool to draw the levels of the selected parameter into the
controller grid.
Once this is completed, you can close the edit window for the sequence part.
That's it.