In most music composition systems you have multiple tracks. Each track may represent an instrument, a sequence, an effect or a mixer strip. The trick is to balance each part of the music composition so that it sounds best. In most music composition systems each track will be represented in the Mix with its own set of controls. The basic controls are of course Volume and Panning. Volume to prevent any track from overpowering the rest or conversely to bring the main instrument into focus. Panning gives music much depth and refers to the stereo position of each part in the Mix. This can be controlled in a stereo environment by moving the Pan control so that the signal is routed proportionately to the left or right audio output. Some music development systems offer built-in effects such as reverb for each instrument. All of these nuances affect the finished product.
The object of mixing is to create an audio file that sounds right and can be distributed to be played by common media players.
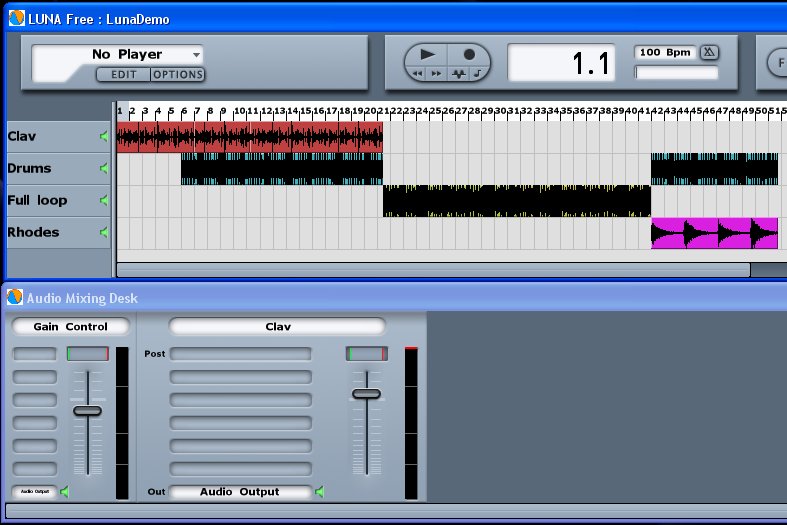
The LunaDemo song (MP3) is setup just to illustrate what can be done quickly and to illustrate why a mix is needed. Give a listen by double clicking on the word MP3. The storage needed to provide all the pieces of this song (WAV loops) would take too long to download, so a compromise was made here to show the setup in LUNA needed to mix some simple loops together - about a half hour's work. And then the Mixdown to Audio feature was used to create the final mix. (Which was converted to MP3 format to reduce the size.
Construction of this song or creating the Mix, goes like this:
- Listen to a few samples and loops to decide what goes together
and how it can be made to sound decent.
- Pay attention to the BPM for each sample loop, if you are using recorded licks.
- After auditioning several disks, 4 samples (loops) were found on the June
2006 issue of Future Music, disk. The samples were transferred to the Luna Free
folder.
- Each loop was loaded to a separate track using the techniques discussed in
prior tutorials.
(Click in bar 1 with the pencil tool, drag right the number of bars needed
and then select Audio from the popup. Select the file from the
explorer interface).
- For clarity, each clip was named and colored (From the right click menu) on
each section.
- Drag the clips along the track and/or copy some of the loops to create the
parts. (Discussed in more detail below)
- Assign each clip to a mixer strip. The default is mixer strip 1 (renamed here
to Gain Control). The Clav clips were assigned to mixer strip 2 (renamed CLAV)
Now comes the iterative part. Play the mix and decide where each track fits best and which parts need to have separate levels and/or need to be panned. Recorded licks are usually pre-adjusted for this, so there may not be much need to mix each individual track - or assign each track to a separate mixer strip.
If the samples are not up to par, the next step is to add a few effects to the Mix. For clarity and brevity, this example uses no effects. (Some effects were obviously used in recording the audio samples to begin with).
Note: There are many ways to create a mix. We could just as easily had several sequences that are routed to VSTi mixer strips which also must be balanced mixed with several audio files used as a background.
Each audio file was used in its entirety. Each unique clip was placed on its own track for ease in handling, but clips can be moved anywhere in the composition. Simply place the cursor over the clip and find a position where it becomes an arrow. Then drag the clip to a new starting location.
To adjust the length of the clip at either end, place the cursor near the end of a clip, it will become a pencil and then you can extend or shorten either end of the clip. The start point can be very precisely specified (see Advanced).
To copy a clip into another position in the mix, make sure that the cursor is an arrow. Press the CTRL key while dragging the clip to the new position - the original clip will remain where it was. The copied clip retains all of the properties of the original clip.
This is where it counts, but is one of the easiest parts of creating music to accomplish. The term rendering is used to mean capturing the sound you hear into an audio file that can be reproduced. In almost all cases this means creating a single .WAV or .AIFF file that is at least 44,100 hz and 16 bits and most likely in stereo (two separate tracks in one file). In many cases, this is dependent on the hardware and software capabilities. Many audio musicians like to master at a higher frequency and bitrate e.g. 48K x 24 bits or sometimes as high as 192K. But for a home studio production, CD Quality is quite good.
Luna does not offer a choice and will output a CD quality stereo audio file.
Once you mix is satisfactory, save the session, so you can reproduce all of your efforts. Click on the FILE button and select Save session as. It is probably wise to save the session under a new name, so that you can get back to a prior mix, if need be. Caution always means making an extra copy.
Once the session is saved, make sure that none of the clips are selected (Click in the grid outside of all clips). LUNA will render just those clips that are selected or render all of the audio clips if no clip is selected.
CAUTION: If you are using a midi hardware synth, you will hear this in the mix, but the output from the midi hardware does not pass through the mixer strips and will not be included in the rendering process. To include this track (or tracks), the output from the midi hardware synth must be recorded as an audio track and added to the mix. (Covered under Advanced).
With no clips selected, click on the FILE button and select Mixdown to Audiofile. Choose a file folder and a file from the explorer or click new file and enter a name for the audio mixdown. When you click OK the mixdown will occur and may take a few seconds to convert your project into an audio file. Once the file is created, you can use almost any media player to play it; You can burn it to a CD; or convert it to MP3; or to any other format that is needed.
LUNA offers the capability of selecting a specific start point within a clip by precisely using the editor. To use this capability, double click on the audio clip to get into the Audio editor. Then select the beginning part of the clip that you will use. Right click at this point and then select start here. A vertical line labeled start will appear.
When copying a clip, sometimes it is useful not to retain the properties of the original clip. If this is the case, press the ALT key when dragging the copied clip. The new clip will have its own properties separate from the original clip.
The final stereo audio file is sometimes subjected to further processing, usually termed mastering. There are programs that can be purchased just for this purpose. Some programs are available that provide limited 'touch up' of your final result. One such program is Audacity, which not only has a fairly good set of audio tools, but can be used to convert files into MP3 and record raw loops, or streaming audio from the internet. Audacity is freeware and has been compiled for Windows, Linux and OSX. It has features that rival many expensive audio editors, so if you are not already using an audio editor, you can benefit from having Audacity in your complement of audio tools. Audacity was used to finish many of the examples in this tutorial.
The mix is made by routing audio through the mixing strips and setting up controls so that you have enough control over each audio output to balance volume and placement. In some cases, more effects are need to be applied to the overall audio output.
The result is an audio file that can be played by standard media players.
Please feel free to leave us some comments about this tutorial by contacting the San Diego Music By Computer group.