LUNA Free - Making use of VSTi
First of all - What is a VSTi?
VST stands for Virtual Studio Technology. This technology is a publicly defined
interface for linking audio components together. The VST was developed by Steinberg
(www.steinberg.net) first for the MAC
and later for the PC where it has burgeoned with the release of thousands of
VST modules that process sound using the common interface defined by Steinberg.
Steinberg first introduced the VST concept in their Studio software Cubase VST.
After the concept was made available to the public, it has become a standard
for developing effects and sound generators and the interface has been adopted
by many other audio software developers (such as MUTools LUNA). The VST modules
are sometimes referred to as Plugins, because they have a common interface and
can be 'plugged' into a common software socket.
Plugins can also be obtained as DX and DXi modules. DX is short for DirectX,
a plugin technology developed by Microsoft and principally available for the
PC. For our discussion we will limit the Plugins to VST modules since the LUNA
studio software is also limited to using VST Plugins. There are hundreds of
free VST Plugin modules available for download on the internet. Most are compiled
for the PC, but many are available for MAC and OSX. To utilize these modules,
they must be downloaded from the internet and then installed into a VST folder.
This folder is then made known to audio processing software (e.g. LUNA) so that
the software can locate and utilize the Plugin.
VST modules (for the PC) are delivered in the form of a .dll module.
Studio software typically goes through a 2-step process to make use of
the .dll module:
1. - The location of the .dll module is defined to the application and it is
scanned for compatibility. Typically it is added to a list of available VST
modules kept by the application.
2. - When the VST module is to be used by the application (e.g. LUNA), it is
selected from the list of available modules and connected into the audio stream.
Although there are a few variations from the 2-step process, I have found that
most applications follow this procedure. LUNA is not an exception and we will
discuss below how to use a VSTi module as a virtual instrument. The use of VST
as an effect (modification of audio signals) will be discussed in a later tutorial.
LUNA calls them VST Plugins and to use them they must be connected to a mixer
strip.
The VSTi is a Virtual Instrument Plugin (hence the 'i' on the end of VST). It
is capable of producing sound through your Audio system. The sound may or may
not be triggered by an input, so there are some VSTi's that just generate constant
or variable sound but are sort of out of control so to speak. Most VSTi's are
triggered by inputs that can be designated by the instrument design. This can
be a midi event, or an audio trigger such as a volume level, a frequency point
or band, pitch, or other audio source.
Tip: The terminology used to describe VST Plugins varies somewhat. However,
the program that 'hosts' the Plugin is usualy termed the HOST. In our tutorial,
The MuTools LUNA program (or CMusic) is the HOST. The VST modules that are installed
in your VST folder are the Plugins. In our tutorial, The LUNA program provides
much more than acting as a Host - It is providing a multi-track studio for synchronising
several different audio streams and mixing these streams together with individual
track controls and multiple plugins for each track.
Tip: Most of the VSTi (instrument) Plugins are termed synths. (Short
for synthesizer). These plugins typically respond to MIDI events which can be
note events or channel controller events (cc). The MIDI events are connected
in a mixer strip to the VSTi Plugins by assigning a sequence of MIDI events
to a Part. In some VSTi's the specific MIDI Channels that control the VST Plugin
can be assigned, so be aware that this assignment is sometimes necessary. Most
VST's are set to respond to all channels, but many drum VST's will only respond
to MIDI events sent on Channel 10 (The General MIDI default channel fror drum
events). Plugins will generally respond to MIDI datat sent from the MIDI INPUT
Port assigned in the HOST so you can generally use your keyboard controller
to test the response of a VSTi plugin.
Installing a VSTi
For this tutorial, we will use a VSTi that is generally available on the internet
at no cost and has been compiled for both MAC and PC. Many VSTi's have been
developed to emulate specific instruments (and emulate them very well). e.g
the Grand 2, a concert piano; The virtual Guitarist, realistic guitar sounds;
The virtual bassist, a variety of bass sounds. These are all available from
Steinberg and are narrow in scope (a single instrument) but huge in sound quality
(and more expensive). There are some other freely available synths that feature
may patches (like General Midi) however, to illustrate the use of a VSTi in
a simple setting, we have chosen to use just a single track featuring a piano.
 We
will start with the maxim-digital audio virtual piano henceforth referred
to as mda-piano. Use your browser internet explorer or Mozilla firefox and browse
to this address - http://www.mda-vst.com/.
In the bottom center of the page you will see the Plugin Spot icon and the links
to Piano for both PC (default) and MAC. Go ahead and link to the downloads.
Download the file to your favorite temporary folder but remember where you saved
the file (ether mda Piano OSX.sit or mda_piano.exe). The mda-piano is not the
most realistic piano sound available, but it is small and can be easily loaded
and appears to be highly compatible.
We
will start with the maxim-digital audio virtual piano henceforth referred
to as mda-piano. Use your browser internet explorer or Mozilla firefox and browse
to this address - http://www.mda-vst.com/.
In the bottom center of the page you will see the Plugin Spot icon and the links
to Piano for both PC (default) and MAC. Go ahead and link to the downloads.
Download the file to your favorite temporary folder but remember where you saved
the file (ether mda Piano OSX.sit or mda_piano.exe). The mda-piano is not the
most realistic piano sound available, but it is small and can be easily loaded
and appears to be highly compatible.
For the PC
TIP: Follow the procedure similar to that described in Tutorial 1 - Installation.
This general procedure applies to almost every software download from the internet.
Typically the software package (a ZIP file or exe file or SIT file) must be
downloaded to your computer and placed in a folder that you can later find.
This is the installation file or setup file which must be then executed or unzipped
to place the contents of the software package into a permanent folder for use.
In the case of the mda-piano the end result will be to extract the mda Piano.dll
module from the mda_piano.exe package by double clicking and following the instructions.
I also would highly recommend setting up a special folder for VST modules such
as \MUSIC\VST. The mda Piano.dll will then be stored in this folder as \MUSIC\VST\mda
Piano.dll, so it can be located by LUNA. The zipfile (mda_Piano.exe) contains
only a single file named mda Piano.dll which has now been extracted to \MUSIC\VST
folder.
For the MAC
Double-click The download link. Then select the DOWNLOAD folder to receive
the VST Plugin SIT or DMG file. Typically for most downloads, the file will
be unpacked. Drag the unpacked module to your VST folder.
Defining your Plugins
 Let's
get started again by running LUNA. Double-click on the LUNA Icon on your desktop
to get LUNA started. If nothing has changed, the last session used will be re-loaded.
In the upper left corner, it should read LUNA Free: Demo.
Let's
get started again by running LUNA. Double-click on the LUNA Icon on your desktop
to get LUNA started. If nothing has changed, the last session used will be re-loaded.
In the upper left corner, it should read LUNA Free: Demo.
If this is not the case, then you need to load the session that we were using
earlier (and is supplied as the initial session). The name of this session is
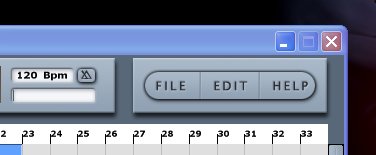
Demo.MuSession. Click on the FILE button in the upper right corner of the screen,
then click on Open Session. Answer Yes to the prompt for closing the existing
session. You will be presented with an explorer type display showing your disk
storage. Navigate to the Folder LUNA Free (You remember where LUNA was installed,
right?). You will see the file Demo.MuSession. Highlight and then click the
OK button to get the old Demo.MuSession file again. All of your previous settings
will have been saved.
Now that we know where the mda-piano is located, it is time to let LUNA know
of our new install. This is done by clicking the FILE Button in the upper right
corner of LUNA. Now click on VST Plugin Manager. This is the list of
Plugins that LUNA knows about (probably currently blank). Step 1 is to let LUNA
become aware of VST Plugins, so click on Add VST Plugins button at the
bottom of the page.
The same explorer display will appear and now you must remember where the mda-piano
module was stored. If you followed our suggestion it is located in the \MUSIC\VST
folder, so navigate to this folder to find mda Piano.dll. With the VST folder
highlighted, click on the OK button. LUNA will then look through this folder
for any VST Plugins and add them to the list (database) of VST plugins. The
process is displayed, so that you can see what happens and how many plugins
are being managed. (If compatibility is an issue, the failed Plugins are noted
and you may get a message to respond to skip the Plugin)
Click on the OK button and the managed list of Plugins will be displayed. You
should see the mda Piano in the list. Click OK to exit. This completes Step
1 for LUNA to be able to use a VST Plugin. If you add more VST modules to your
plugin folders, this step must be repeated in order to add these new plugins
to the list (database).
TIP: The List of VST Plugins (database) is contained in a file named
VSTPlugins.xml in the LUNA Free\Settings folder. It should never be necessary
to edit this file.
Using a VSTi Virtual Instrument
In this example we will be assigning the mda-piano VSTi to the output of the
midi track that is in the Demo session supplied with LUNA Free. The existing
track may be already assigned to a MIDI output or it may be blank (No Player).
To start the assignment, click on the track to select it. The track should be
darkened.
Now right-click on the track and then click Part and then click Choose
Player. On the menu then click Create New Synth + Mixer Strip. A
list of the VSTi's will be presented, now click on mda Piano. In the Mixer window
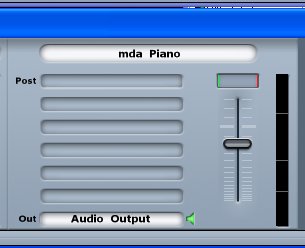
a new mixer strip will appear with the name of the mda Piano. This is the volume/panning
controls for the mda Piano. As you might guess, the mda-piano is triggered by
midi input. So by sending the output of the midi track to a mixer strip that
is associated with the VSTi module, you are directing the midi events into the
synth.
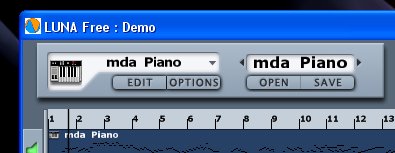
 Since
the track is selected, the player will also appear in the player window in the
upper left corner of the Composer window. If there are any presets (named settings)
for the selected player, they will appear in the preset window (it should now
read mda Piano). Now click on the start/stop arrow in the Transport tool bar.
You should hear the piano and see the mixer strip activity level. The panning
can be controlled with the green and red (port and starboard) strip by dragging
back and forth. The Volume of this channel is controlled by dragging the level
control.
Since
the track is selected, the player will also appear in the player window in the
upper left corner of the Composer window. If there are any presets (named settings)
for the selected player, they will appear in the preset window (it should now
read mda Piano). Now click on the start/stop arrow in the Transport tool bar.
You should hear the piano and see the mixer strip activity level. The panning
can be controlled with the green and red (port and starboard) strip by dragging
back and forth. The Volume of this channel is controlled by dragging the level
control.
At the top left, you may step through the presets by click on the little arrows
on either end of the preset window. The 2nd preset is named Plain Piano, then
Compressed Piano, etc. You can change these as the track is playing to hear
the differences in each setting.
Looping Measures
To really get the sound right, it takes some iterative listening and tweaking.
This is where the VST really shines because you have all these neat controls
to tweak. But often the spot you want to use slips on by all too fast. This
is where looping comes in.
To loop the track that is selected, simply right-click in the measure numbers
above the track (and below the transport bar). A menu will be presented
that allows you to set loop points and toggle looping on/off. From the menu
click on - Loop Selected Parts. The measures above this track will be displayed
in Red. This means that looping is ON. Now when you start the transport it will
play to the end of the looped section and start over again at the beginning
of the looped section.
You can also set looping to start at the point of the cursor and end at the
point of the cursor. Then simply right-click and toggle looping ON (or OFF).
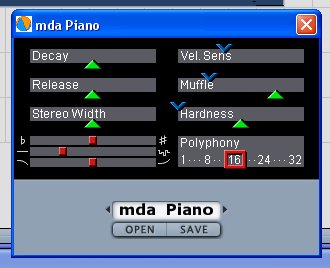 To
really get into the nitty gritty of editing the sound, most VST's offer an abundance
of tweaks. The mda-piano is no exception. Click on the Edit Button under mda
Piano at the upper left of the Composer Window. This will reveal the settings
for each of the presets. By clicking on the arrows at either end of the preset
window and changing the preset, you can see which settings are being changed
and how much to create the named preset.
To
really get into the nitty gritty of editing the sound, most VST's offer an abundance
of tweaks. The mda-piano is no exception. Click on the Edit Button under mda
Piano at the upper left of the Composer Window. This will reveal the settings
for each of the presets. By clicking on the arrows at either end of the preset
window and changing the preset, you can see which settings are being changed
and how much to create the named preset.
Feel free to fiddle with these settings and hear how the sound can be modified
to fit the situation. Note that now we are inside the mda-piano module and out
of the realm of general audio processing. The mda-piano has its own set of rules
for developing its unique sounds. But we won't go there now.
To capture what we have done, so far, requires only to click on the File Button
and select - Save Session as .. This will allow you to save the changes into
a new session and preserve the original settings for Demo. Again you will be
presented with an explorer screen where you must navigate to the folder where
the new session is to be saved. Highlight this folder and then click on New
File button at the bottom of the display. Type in a new name (you don't need
to add the extension .MuSession) then click on OK or press Enter. All changes
from this point forward will be saved to the new named session. And you can
return to this point after exiting, by simply loading this new session.
Now that we can get some music going, it's time to move on to the finer points
such as recording some midi events. You will need a keyboard controller for
the next tutorial.
Advanced (Windows Only)
For those of you that are more familiar with MIDI song development, but want
to use a VSTi, I would highly recommend the sfz from RGC Audio. This is a Soundfont
VSTi instrument that will load and select soundfont banks and respond to patches.
This instrument is supplied as a standalone executable or a VSTi. So it will
work with LUNA or any other VST Host program.
If you are familiar with soundfonts (used in the EMU/Creative line of soundcards)
you may have access to a large variety of Soundfont banks which are also available
throughout the internet. Download the sfz VSTi from RGC:AUDIO
and install it in your VST folder. Add it to LUNA by clicking on the File button
and selecting the VST Plugin Manager. While you are on the net, cruise on over
to Hammersound.net and get a copy
of the neat General Midi Soundfont bank named sYnerGi-8MB.sf2. This bank
contains 128 GM instruments, 8 percussion sets and a few more bonus banks. It
works beautifully with the sfz module to provide a complete soft synth General
Midi set of sounds. The sound bank download is both zipped and sfpacked so it
is only about 6MB. It must be unzipped to a temporary Folder and then the SFPack
program is used to unPack it to a Soundfont folder (or the VST Folder will work).

Use the Upper left Player window to Choose a Player and then Create New
Synth + Mixer Strip and add the sfz Soundfont VSTi as the player. Click
on the Edit button and then click on the sfz File area to find and load the
soundfont of your choice.
To give you an idea of what sounds can be achieved with this setup, take a
look at the arrangement above. Here are 4 sequence tracks (MIDI). Each track
chose a new player / mixer strip using the sfz sound font player. Each track
loaded the sYnerGi-8MB.sf2 sound bank. Each track selected a different instrument
e.g. Vibes, Bass, drums (in bank 128), and piano. Fairly easy to set up. The
result sounds like this ... OpusFunk.mp3 (double
click to listen).
The sequence tracks were ripped from a MIDI file (originally created by Phillip
Van Galen). The MIDI file was reduced to 4 tracks using Voyetra Orchestrator
Plus (A midi editor - look under Files at the Music
By Computer site.). You may note that there are some effects added to enhance
a couple of the tracks - Leslie effect on the vibes and Delay (chorus) on the
Piano. We will get into effects in a later tutorial.
Another neat synth from RGC:Audio
is the Triangle II . This synth is totally self contained and is also Freeware.
It has a load of presets, but once you get started with this baby, you will
tend to create your own sounds - Look at all those knobs. It is installed exactly
like all the other VSTi, so it should cause no difficulties if you follow the
simple procedures in the Summary below. The Triangle II also comes with a fairly
extensive manual which describes what each of the knobs is used for. Still pretty
daunting, but you can create some very satisfying sounds.
Polymer Suds was created entirely using the LUNA
program and Triangle II. (Actually the piece was first composed using PG
Music midi tools to create the melody and backing and whittled to 4 Midi
tracks using the Triangle II synth to audition the patches). The basic midi
file was imported into LUNA and then set up on 4 mixer strips. A little reverb
was added to give the final sound some depth, but essentially with so many internal
settings available in the Triangle II, the effects only get in the way.
Once the piece is mixed (see our tutorial on mixing),
It is a simple matter to click on the FILE button and select Mixdown to Audiofile
which creates a CD Quality stereo audio file that can be burned to a CD or converted
to an MP3. For the record, I use the Lame MP3 encoder and Audacity
to convert my WAV files to MP3. I find that I can get the best representation
using this encoder.
Summary
Here are the steps to using a VST ...
1. Download the setup file for a VSTi instrument
2. Install the .dll file (and any presets) into your VST folder
3. Run the VST Plugin Manager (File button)
4. Select a track and choose a player - use Create New Synth + Mixer Strip
The first 3 steps are only needed when a new VST module is installed on your
computer.
That's it.